


15
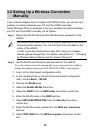
3.2 Setting Up a Wireless Connection
Manually
If your network adapter does not support the WPS function, you can set up a
wireless connection between your PC and the HG533 manually.
Takes Windows XP as an example, to set up a wireless connection between
your PC and the HG533 manually, do as follows:
Step 1 Record the WLAN name and the WLAN access password of the
HG533.
The WLAN name (SSID) and WLAN access password of the HG533
are preset before delivery. You can find them from the label on the
bottom of the HG533.
In order to prevent unauthorized users from using your wireless
network, please change them. For details, see section 5.2 “Changing
the Wireless Network Name and the Access Password
”。
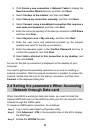
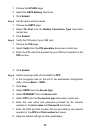
Step 2 Set the WLAN and WLAN access password of the HG533.
To set the wireless network name and the access password, do as follows
(taking the authentication type WPA-PSK/WPA2-PSK as an example):
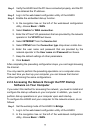
1. Log in to the Web-based configuration utility.
2. In the navigation tree on the left of the web-based configuration
utility, choose Basic > WLAN.
3. Choose the WLAN page.
4. Select the Enable WLAN check box.
5. Select the SSID1 from the SSID index drop-down combo box.
6. Enter the WLAN name in the SSID text box.
7. Select WPA-PSK/WPA2-PSK from the Security drop-down
combo box.
8. Enter the WLAN access password in the WPA pre-shared key
text box.
9. Select TKIP+AES from the WPA encryption drop-down combo
box.