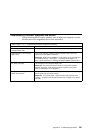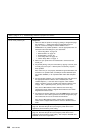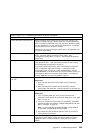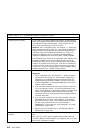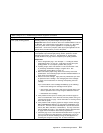
Table 8 (Page 6 of 7). Troubleshooting Problems: Symptoms and Actions
Symptom Action
Blank pages If all sheets are blank, the toner supply could be low but the toner sensor
is not detecting this condition.
Response: Replace the toner cartridge. See “Changing the Toner
Cartridge” on page 140 for instructions on removing and replacing the
toner cartridge.
Random blank pages during a print job can be caused by multiple sheets
of paper being fed through the machine simultaneously.
Response: Reload the paper tray with fresh, dry paper. Fan the paper
before loading it. If the problem still exists with the new toner cartridge
installed, check the page count. See “Machine Information Menu” on
page 80. If you have printed over 350,000 pages, 700,000 pages, and so
on, you may want to consider installing a usage kit. See Appendix D,
“Installing the Usage Kit” on page 241. for more information.
Paper jams in the printer
repeatedly
Responses:
1. Make sure that the paper tray guides are adjusted correctly for the
size paper you are using.
2. The paper you are using in the printer may not be compatible with
your printer. Verify that the paper you are using conforms to the
specifications for the printer.
3. Check for obstructions in the paper path. Obstructions may include
paper clips and corners of previously jammed paper.
4. Check the paper supply tray for damaged paper.
5. Reload the paper tray with fresh, dry paper. Fan the paper before
loading it.
6. For duplex jams, ensure that the duplex unit is installed correctly.
See “Installing the Duplex Unit Option” on page 171.
7. For envelope jams in or near the fuser, you may need to set the
envelope levers on the fuser to the up position to accommodate
thicker envelopes. See “Setting Fuser Envelope Levers” on
page 126.
See “Selecting Paper and Other Printable Material” on page 83 for more
information.
The printer takes too long to start
printing
The printer is frequently “warming up.”
Response: Change the value for the power-saving mode (or sleep mode)
to a larger value. See “Changing the Power-Savings (Sleep Mode)
Interval” on page 40 for instructions on how to change the setting.
212 User's Guide


