


2-4
Installin
g
and Confi
g
urin
g
y
our xDSL Router
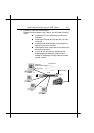
2.2 Hardware Installation
Before start to configure your Router, you have to complete all the
hardware installation. The following steps provide instructions for
installing your Router.
1. Be sure the power switch on the right side of the Router is at the
OFF status.
2. Connect the power adaptor to the power jack that marked Power
at the rear panel of the Router, then plug in the DC power
adaptor to the wall electrical outlet.
3. Connect the Ethernet cable.
A) If connect to computer directly
Connect one end of Ethernet straight-through cable to the
Ethernet port on your computer, then connect the other
end of Ethernet straight-though cable to the connector that
marked 10/100Base-T at the rear panel of the Router.
B) If connect to more than one computer via Hub Connect one
end of Ethernet straight-through cable (If your up-link hub
without cascade switch, please use an Ethernet crossover
cable instead) to the uplink port on the Ethernet Hub, then
connect the other end of Ethernet cable to the connector that
marked 10/100Base-T at the rear panel of the Router.
4. Connect one end of RJ11 telephone cable to the xDSL line jack
that marked xDSL at the rear panel of the Router, then connect
the other end of RJ-11 telephone cable to the xDSL service port
that your xDSL service provider or ISP installed.
5. Connect the male (9 pin) end of the RS-232 serial cable to the
connector that marked Console port at the rear panel of the
Router, then plug the other end of the RS-232 serial cable to the
RS-232 serial port of your computer.
6. Turn on the power switch. The Router should perform a self-test,
and then be ready for use.