


Step 3. Set the SCSI ID or Arbitrated Loop Physical Address
Perform one of the following steps:
v If you are installing an Ultrium 2 Tape Drive that uses a SCSI interface (Model
T400), you must set the drive’s SCSI ID. For instructions, go to “Setting the SCSI
ID (SCSI Drive Only)” on this page.
v If you are installing an Ultrium 2 Tape Drive that uses a Fibre Channel interface
(Model T400F), you must set the drive’s Arbitrated Loop Physical Address
(AL_PA). For instructions, go to “Setting the Arbitrated Loop Physical Address
(Fibre Channel Drive Only)” on page 19.
Setting the SCSI ID (SCSI Drive Only)
You can set the SCSI ID in one of three ways:
v By placing jumpers on the SCSI ID connector
v By using a SCSI ID switch that is connected to the SCSI ID connector
v By issuing a command from the library to set the SCSI ID through the drive’s LDI
interface
The sections that follow describe each method of setting the SCSI ID.
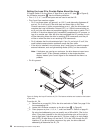
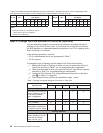
Setting the SCSI ID with Jumpers
You can set the SCSI ID on the Ultrium 2 Tape Drive by installing 2-mm jumpers on
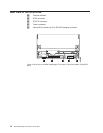
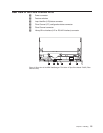
the drive’s SCSI ID connector (see 3 in Figure 2 on page 14). Your tape drive
may come set to a default SCSI configuration, with jumpers already installed. To
change the default SCSI configuration, contact your sales or or technical support
representative. You can change the SCSI ID by rearranging, adding, or removing
jumpers.
To set the SCSI ID:
__ 1. Locate the SCSI ID connector (see 3 in Figure 2 on page 14).
__ 2. Before attaching the SCSI bus cable to the server, decide the SCSI ID
number that you want. Make sure that the ID is not being used by another
device.
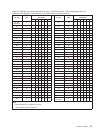
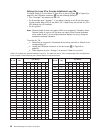
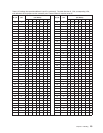
__ 3. Referring to Figure 5 on page 18, find the ID number that you chose then
place jumpers on the connector pins as shown (use a pair of needle-nose
pliers to connect the jumpers to the pins that are shaded).
Note: If you set the SCSI ID to 15, the drive will not necessarily be set to
that ID; instead, the drive will expect to receive the SCSI ID through a
command over its LDI interface.
Chapter 3. Installing 17