


Manually Removing a Tape Cartridge
If problem-determination procedures identify the Ultrium 2 Tape Drive as the source
of a problem, you can optionally perform one of the following:
v Replace the entire unit. For more information, contact your OEM Product
Application Engineer (PAE).
v Manually remove the cartridge (see “Removing the Cartridge”).
v If you are unable to manually remove the cartridge, contact trained service
personnel for assistance. Refer the service personnel to the instructions in
“Fixing an Internal Jam” on page 88.
Attention:
If you are not a trained service person, do not attempt to open the drive
for repairs. Attempting a repair other than the manual removal of a tape
cartridge will void your warranty.
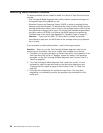
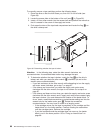
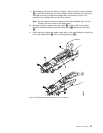
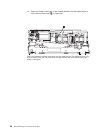
Removing the Cartridge
If a tape cartridge fails to eject from the Ultrium 2 Tape Drive, you can manually
remove the cartridge. The following tools are required for the procedure:
v 2.5-mm allen wrench
v Small-blade screwdriver or potentiometer-setting tool
v 2-mm hex wrench
v #3 Phillips screwdriver
v Needle-nose pliers
v Flashlight (optional)
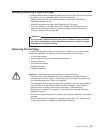
Attention: Before performing this procedure, note the following:
v Ensure that you have attempted all normal methods of removing the tape
cartridge from the drive. Refer to “Removing a Tape Cartridge” on page 35 and
the troubleshooting tips in Table 13 on page 65.
v This procedure may damage the stuck tape cartridge. If you use this procedure,
copy the data from the stuck cartridge to another cartridge. If you choose to
reuse the stuck cartridge, refer to the instructions in “Repositioning or
Reattaching a Leader Pin” on page 55. If you believe the cartridge has been
damaged, replace it.
v Do not use a power screwdriver to perform this procedure because it can destroy
the tape.
v Never touch the head or electronic components within the drive. Touching may
cause contamination or damage by electrostatic discharge.
Chapter 7. Servicing 85