


16
(T) - Assigning SNMP Trap Destinations
Traps are sent by the manageable device to a management PC when a certain event
takes place. To enter a trap destination, press
T
. At the prompt, “Enter a New IP
Address,” type the IP address of the destination device, and then press
Enter
. Next,
type the name of the
community
string
(that the destination device has been
configured to accept) and press
Enter
. Select whether the trap is for SNMP version
1
or
2c
and press
Enter
. This function enables all of the device traps. When you want
to selectively activate and de-activate traps, use iConfig to configure your device.
Supported traps include: Link Down, Link Up, Cold Start, Warm Start, and
Authentication Failure.
When deployed in pairs, iMcV-Giga-FiberLinX-II also supports the following traps:
•
Remote Unit Lost
•
Remote Unit Found
•
Far End TX Link Up
•
Far End TX Link Down
•
Remote Unit Cold Start
•
Remote Unit Warm Start
(K) - Removing All SNMP Trap Destinations
To remove all trap destinations, press
K
. You will then be prompted, “Are you sure
you want to delete all trap destinations?” Press
Y
to continue, press
N
to abort. Press
Enter
to finish.
This function will delete all trap destinations. If you want to be able to selectively
delete trap destinations or select the type of trap reported or not reported, use
iConfig to configure your device.
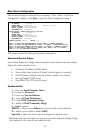
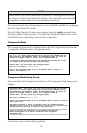
(C) - Creating SNMP Community Strings
The default community string is named “public” and has read/write access. It is
recommended that you create custom community strings (with read-only access for
general use and another with read/write access for the administrator) and test them
before deleting “public.” To create a new community string, go to the main
configuration screen and press
C
. Enter the name of the new community (up to 16
characters, no spaces) and press
Enter
. Next, type one of the following to assign the
community string’s access rights:
•
R
= read-only access •
W
= read/write access •
Enter
= abort