


Raptor AT – Installation Guide
8
The Raptor AT uses standard DIMMs. To determine the
actual capacity of a 1 by 64 DIMM, simply multiply the
1MB by 8.
Step 2 DRAM, CPU, Disk-on-Chip and
Cables Installation
Depending upon how your Raptor AT is configured you may need to
install the following:
• DRAM (DIMMs)
• CPU
• Disk-on-chip
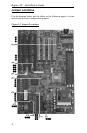
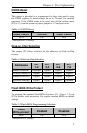
Raptor AT Memory Configuration
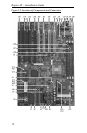
The Raptor AT offers 3 DIMM memory sockets (Locations J28,
J27 and J26 – Figure 1-2). They can be configured with 3.3V
unbuffered SDRAM modules. It is very important that the quality
of the DIMMs is good. Unreliable operation of the system may
result if poor quality DIMMs are used. Always purchase your
memory from a reliable source. We strongly recommend using
PC100 memory module (REQUIRED when using PIII or 100MHz
operation). The Raptor AT also supports ECC memories.
CPU Installation
The Raptor AT currently supports the following CPUs:
• Full series of Intel Celeron and PIII processors (PGA 370).
1. Improper installation of the CPU may cause
p
ermanent damage to both the system board and the
CPU. -- Void of warranty
2. Always handle the CPU by the edges, never touch the
pins.
3. Always use a heatsink and a CPU fan.