10
Network settings
Setting the NETWORK SET menu screen
When using a LAN card, network related settings for KA-DV5000 are made using NETWORK SET of the NETWORK PACK CONFIG
menu. Settings will be stored in the KA-DV5000 memory even when turning the power off.
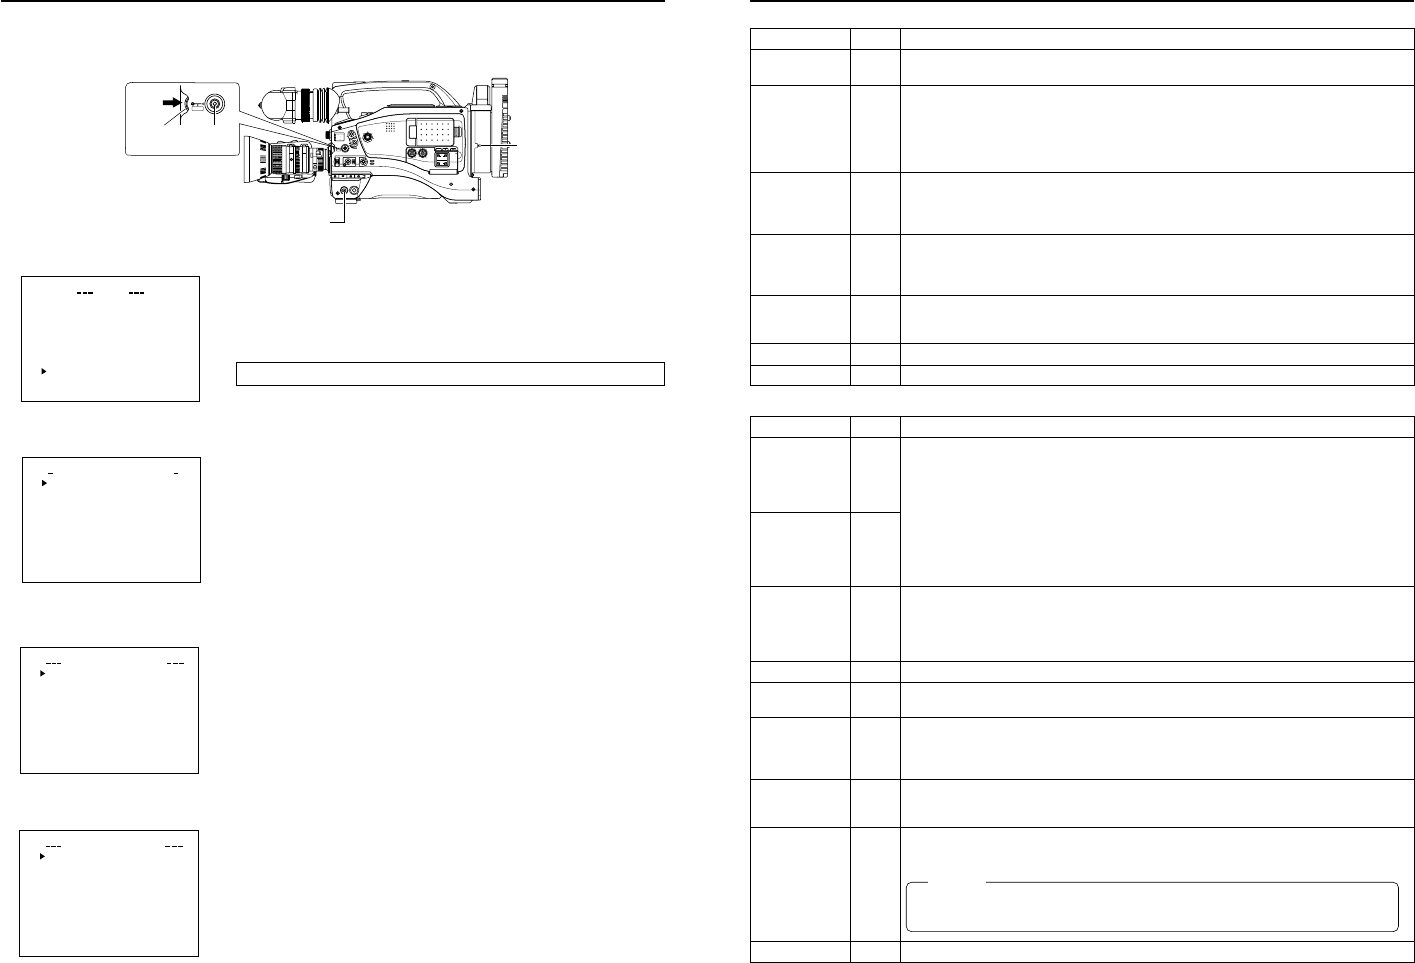
POWER switch
POWER SUPPLY
switch
\Settings are made by viewing the LCD screen or viewfinder screen.
If OUTPUT CHAR of the OTHERS (1/2) menu screen is set to ON, the menu screen
also appears on the monitor screen connected to the MONITOR OUT or Y/C OUT
connector.
Display the NETWORK SET menu screen
1.
Turn on the GY-DV5000 and KA-DV5000 power.
2.
Check to see that the card status display has changed from a flashing to constant
display.
3.
Press the STATUS button for about 1 seconds to display the TOP MENU screen.
4.
Turn the SHUTTER dial, move the cursor (t) to NETWORK PACK CONFIG and
press the SHUTTER dial.
● The NETWORK PACK CONFIG menu screen appears.
5.
Turn the SHUTTER dial, move the cursor (t) to NETWORK SET and press the
SHUTTER dial.
● The NETWORK SET [1/2] menu screen will appear.
The NETWORK SET menu screen is structured by 2 pages.
\Select NEXT PAGE and press the SHUTTER dial to display the NETWORK SET
[2/2] menu screen.
Select PAGE BACK in the NETWORK SET [2/2] menu screen and press the SHUT-
TER dial to return to the NETWORK SET [1/2] menu screen.
6.
Set DHCP to ON or OFF in the NETWORK SET [1/2] menu screen.
Items other than DHCP are set in the individual setting screen. (☞ page 11)
7.
To return to the normal screen after completing setting, perform one of the follow-
ing operations.
● Press the STATUS button
● Select PAGE BACK to return to the TOP MENU screen. Select EXIT in the TOP
MENU screen and press the SHUTTER dial.
TOP MENU screen
NETWORK PACK CONFIG
menu screen
NETWORK SET [1/2]
menu screen
NETWORK SET [2/2]
menu screen
CAMERA OPERAT IO
MENU
N
CAMERA PROCESS ..
..
AUDIO/ V IDEO ..
LCD/VF . .
TC/UB/ CLOCK. .
OTHERS . .
..
FILE MAN E..AG
MENU ALL RESET C ELANC
N
E
TWO
R
KPACKCONFIG
E
X
IT
NET WORK T . .
..
..
SE
ORTWENKACK
P
ON
C
IG
F
ENCODE SET
MPEG REC
T
RGI
MOV I E
C
LI
PS
ET
MENU RES ET CANCEL
PAGE B
A
CK
HOST NAME. .
..
..
WOETNRKET
S
1/2
]
[
FOF
DHCP
IP ADD
R
ESS
NET M SA
K
..GATEWA
Y
NEXT P
A
GE
PAGE B
A
CK
..
WOETNRKET
S
2/2
]
[
..
HTTP
..
RTSP
FOF
WLAN
WLAN E
S
S
WLAN C
H
C2
H
-
DI
AD
H
O
CM
O
DE
MEUSER N
A
..
..PASS
W
O
RD
PAGE B
A
CK
MONITOR
EDITSEARCH
FILTER
STATUS
SHUTTER
MENU
AUTO IRIS
BACK L
NORMAL
SPOT L
STRETCH
NORMAL
COMPRESS
FULL AUTO BLACK LOLUX
MODE
POWER
ON OFF
VTR
OPEN
VTR
CAM
1
3200K
5600K
5600K
5600K
ND
/
/
ND
2
.3
.4
1
8
1
64
CH-1
AUDIO INPUT
AUDIO SELECT
CH-2
CH-1 CH-2
FRONT
REAR
AUTO
MANUAL
AUDIO
LEVEL
CH-1 CH-2
PULL
OPEN
LCDBRIGHT DISPLAY
STATUS
SHUTTER
MENU
NETWORK
PACK
KA-DV5000
POWER
SUPPLY
ONOFF
SHUTTER
dial
STATUS
button
11
[1/2] screen ⅷindicates default factory setting.
Item
HOST NAME
DHCP
IP ADDRESS
NETMASK
GATE WAY
NEXT PAGE
PAGE BACK
Setting
ⅷOFF
ON
[2/2] screen
Item
RTSP
HTTP
WLAN AD HOC
MODE
WLAN ESS-ID
WLAN WEP
KEY
WLAN CH
USER NAME
PASS WORD
PAGE BACK
Setting
1
:
ⅷ8554
:
32767
1
:
ⅷ80
:
32767
ⅷOFF
AHDM
IBSS
1CH
ⅷ2CH
:
14CH
Description
The screen for setting RTSP and HTTP port numbers appears.
Normally, the unit can be used without changing the factory settings.
If there are port restrictions for the LAN environment of your PC, consult your network administrator.
* When changing a port number, refer to “5-1. Connecting with Camcorder” of the “Streamproducer”
User’s Guide of the network distribution software to change settings.
* Do not use the same port numbers for RTSP and HTTP.
* When a port number is changed, switch the power of the GY-DV5000 off once, and then switch it
on again.
Wireless LAN setting
OFF: Use this setting when performing communication via access point.
AHDM/IBSS: Use this setting when performing communication in AD HOC mode with a PC con-
nected with a wireless LAN card. (
☞
page 15)
* When this item is set to AHDM or IBSS, DHCP cannot be set to ON.
Displays the wireless LAN ESS-ID input setting screen (Max. 32 alphanumerical characters)
When encrypting data, set the WEP KEY (10 characters consisting or letters a ~ f and numbers).
Must be compatible with access point authentication for the use of this item.
Wireless LAN channel setting
Displays the user name input setting screen. (Max. 8 alphanumerical characters)
Used when controlling GY-DV5000 via LAN card. (☞ page 30)
[Factory setting: jvc]
Displays the password input setting screen. (Max. 8 alphanumerical characters)
Used when controlling GY-DV5000 via LAN card. (☞ page 30)
[Factory setting: ka-dv5k] (Password is hidden)
Pressing the SHUTTER dial returns to the NETWORK SET [1/2] menu screen.
Network settings
NETWORK SET menu screen items
Description
Displays the host name input setting screen. (Max. 63 alphanumerical characters)
[Factory setting: none]
Select whether DHCP server is used.
OFF: Use this setting when using LAN connection rather than DHCP.
When this setting is used, IP ADDRESS and NETMAST, GATEWAY must also be set.
ON: Use this setting when using DHCP connection.
When using this setting, IP ADDRESS and NETMASK, GATEWAY are automatically set.
* When DHCP is set to ON, WLAN ADHOC MODE cannot be set to AHDM or IBSS.
Displays the IP address setting screen.
When using LAN connection with DHCP set to OFF, this setting is required. Set a unique IP address.
IP ADDRESS setting is not available when DHCP is set to ON.
[Factory setting] 192.168.100.101]
Displays the subnet mask input screen.
This setting is required when using LAN connection with DHCP set to OFF.
NETMASK setting is not available if DHCP is set to ON.
[Factory setting: 255.255.255.000]
Displays the gateway address input screen.
GATEWAY setting is not available when DHCP is set to ON.
[Factory setting: 192.168.100.254]
Pressing the SHUTTER dial displays the NETWORK SET [2/2] menu screen.
Pressing the SHUTTER dial returns to the NETWORK PACK CONFIG menu screen.
Caution
• Keep a memo of the password since it is only displayed during the actual setting. The password
will be hidden using asterisks (*) when accessing the password menu screen again.
• When performing MENU RESET, ka-dv5k will return to its factory settings. (☞ page 9)


