


24
IEOVMCIP
L
MC 00 5
.
0asf R
REVIE
W
DELET
E
PROTECT
PAGE B
A
CK
IEOVMCIP
L
MC 00 5
.
0asf WR/
REVIE
W
DELET
E
PROTECT
PAGE B
A
CK
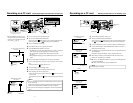
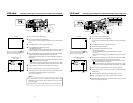
MONITOR
EDITSEARCH
FILTER
STATUS
SHUTTER
MENU
AUTO IRIS
BACK L
NORMAL
SPOT L
STRETCH
NORMAL
COMPRESS
FULL AUTO BLACK LOLUX
MODE
POWER
ON OFF
VTR
OPEN
VTR
CAM
1
3200K
5600K
5600K
5600K
ND
/
/
ND
2
.3
.4
1
8
1
64
CH-1
AUDIO INPUT
AUDIO SELECT
CH-2
CH-1 CH-2
FRONT
REAR
AUTO
MANUAL
AUDIO
LEVEL
CH-1 CH-2
PULL
OPEN
LCDBRIGHT DISPLAY
MODE
VTR
CAM
STATUS
SHUTTER
MENU
NETWORK
PACK
KA-DV5000
POWER
SUPPLY
ONOFF
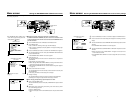
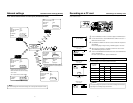
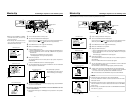
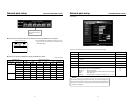
Movie clip
Protecting a clip file on a CF memory card
Clips recorded on a CF memory card can be protected using the MOVIE CLIP screen.
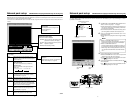
1.
Insert an already recorded CF memory card.
2.
Turn on the GY-DV5000 and KA-DV5000 power.
Check to see that the
C
F
display appears on the LCD screen/viewfinder screen.
(When the power is turned on,
display will flash during initialization.)
3.
Set the MODE switch to “VTR”. (Light the VTR indicator.)
4.
Make sure GY-DV5000 is not in operation.
5.
Display the MOVIE CLIP screen.
q Press the STATUS button for about 1 seconds to display the TOP MENU screen.
w Turn the SHUTTER dial, move the cursor (t) to MOVIE CLIP and press the
SHUTTER dial.
● The latest page of the MOVIE CLIP screen appears.
R/W display appears on the right of the clip number.
6.
Select the clip to protect.
Turn the SHUTTER dial, move the cursor (t) to the clip to protect and press the
SHUTTER dial.
● The CLIP FUNCTION screen of the selected clip appears.
7.
Turn the SHUTTER dial, move the cursor to PROTECT in the CLIP FUNCTION
screen and press the SHUTTER dial.
8.
To return to the MOVIE CLIP screen after completing setting, select PAGE BACK
and press the SHUTTER dial.
\To cancel the protection, select PROTECT in the CLIP FUNCTION screen and
press the SHUTTER dial.
● The R display will change to an R/W display and the protection on the clip will be
canceled.
● The selected clip is protected.
The R/W display on the right of the clip
number will change to an R display.
Protected
● When executing FORMAT in the MOVIE
CLIP SET menu screen, protected clips
will also be deleted.
● Protected clips will not be deleted even
when executing DELETE ALL in the
MOVIE CLIP SET menu screen.
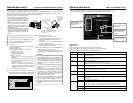
CLIP FUNCTION screen
AUDIO/ V IDEO ..
LCD/VF . .
TC/UB/ CLOCK. .
OTHERS . .
..
FILE MAN E..AG
MENU ALL RESET C ELANC
N
E
TWO
R
KPACKCONFIG
M
O
VIE CLIP..
E
X
IT
MENU
TOP MENU screen
MOVIE CLIP screen
CLIP FUNCTION screen
MC 00 5
.
0asf WR/
IEOVMCIP
L
02 03/02/
09 00:00:
MC 00 6
.
0asf WR/
02 03/02/
09 30:25:
MC 00 7
.
0asf WR/
02 03/02/
10 10:55:
MC 00 8
.
0asf WR/
02 03/02/
11 00:00:
PAGE B
A
CK
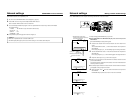
Clip number
POWER switch MODE switch
STATUS
button
SHUTTER
dial
POWER SUPPLY
switch
25
IEOVMCIP
L
MC 00 8
.
0asf WR/
REVIE
W
DELET
E
PROT
E
C
T
PAGE B
A
CK
IEOVMCIP
L
MC 00 8
.
0asf WR/
DELET
E
DELET
E
OK
?
YES
PAGE B
A
CK
..
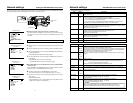
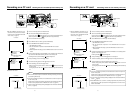
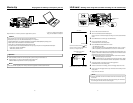
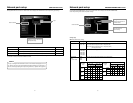
Movie clip
Deleting a clip file on a CF memory card
Confirmation screen
Clips recorded on a CF memory card can be deleted using the MOVIE CLIP screen.
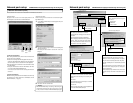
1.
Insert an already recorded CF memory card.
2.
Turn on the GY-DV5000 and KA-DV5000 power.
Check to see that the
C
F
display appears on the LCD screen/viewfinder screen.
(When the power is turned on,
display will flash during initialization.)
3.
Set the MODE switch to “VTR”. (Light the VTR indicator.)
4.
Make sure GY-DV5000 is not in operation.
5.
Display the MOVIE CLIP screen.
q Press the STATUS button for about 1 seconds to display the TOP MENU screen.
w Turn the SHUTTER dial, move the cursor (t) to MOVIE CLIP and press
the SHUTTER dial.
● The latest page of the MOVIE CLIP screen appears.
6.
Select the clip to delete.
Turn the SHUTTER dial, move the cursor (t) to the clip to delete and press the
SHUTTER dial.
● The CLIP FUNCTION screen of the selected clip appears.
7.
Turn the SHUTTER dial, move the cursor to DELETE in the CLIP FUNCTION
screen and press the SHUTTER dial.
● A “DELETE OK?” confirmation message appears. (Confirmation screen)
8.
To delete, select YES using the SHUTTER dial and press the SHUTTER dial.
● “DELETE . .” flashes on the screen for about 5 seconds and then the MOVIE
CLIP screen returns. The clip is deleted from the MOVIE CLIP screen.
\To cancel the deletion, select PAGE BACK and press the SHUTTER dial.
Memo
●Protected clips cannot be deleted even when selecting DELETE.
In this case, “PROTECT!” will flash for about 2 seconds and then CLIP FUNC-
TION screen returns.
●After deleting a clip and there are no remaining clips left on the CF memory card,
“NO CLIP!” flashes on the screen for about 3 seconds and then the TOP MENU
screen returns.
●To delete all clips, use the MOVIE CLIP SET in the NETWORK PACK CONFIG
menu screen. (☞ page 21)
TOP MENU screen
MOVIE CLIP screen
CLIP FUNCTION screen
Deleting Flashing display
MC 00 5
.
0asf WR/
IEOVMCIP
L
02 03/02/
09 00:00:
MC 00 6
.
0asf WR/
02 03/02/
09 30:25:
MC 00 7
.
0asf WR/
02 03/02/
10 10:55:
MC 00 8
.
0asf WR/
02 03/02/
11 00:00:
PAGE B
A
CK
AUDIO/ V IDEO ..
LCD/VF . .
TC/UB/ CLOCK. .
OTHERS . .
..
FILE MAN E..AG
MENU ALL RESET C ELANC
N
E
TWO
R
KPACKCONFIG
M
O
VIE CLIP..
E
X
IT
MENU
MONITOR
EDITSEARCH
FILTER
STATUS
SHUTTER
MENU
AUTO IRIS
BACK L
NORMAL
SPOT L
STRETCH
NORMAL
COMPRESS
FULL AUTO BLACK LOLUX
MODE
POWER
ON OFF
VTR
OPEN
VTR
CAM
1
3200K
5600K
5600K
5600K
ND
/
/
ND
2
.3
.4
1
8
1
64
CH-1
AUDIO INPUT
AUDIO SELECT
CH-2
CH-1 CH-2
FRONT
REAR
AUTO
MANUAL
AUDIO
LEVEL
CH-1 CH-2
PULL
OPEN
LCDBRIGHT DISPLAY
MODE
VTR
CAM
STATUS
SHUTTER
MENU
NETWORK
PACK
KA-DV5000
POWER
SUPPLY
ONOFF
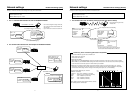
POWER switch
MODE switch
STATUS
button
SHUTTER
dial
POWER SUPPLY
switch