36
Network pack setup
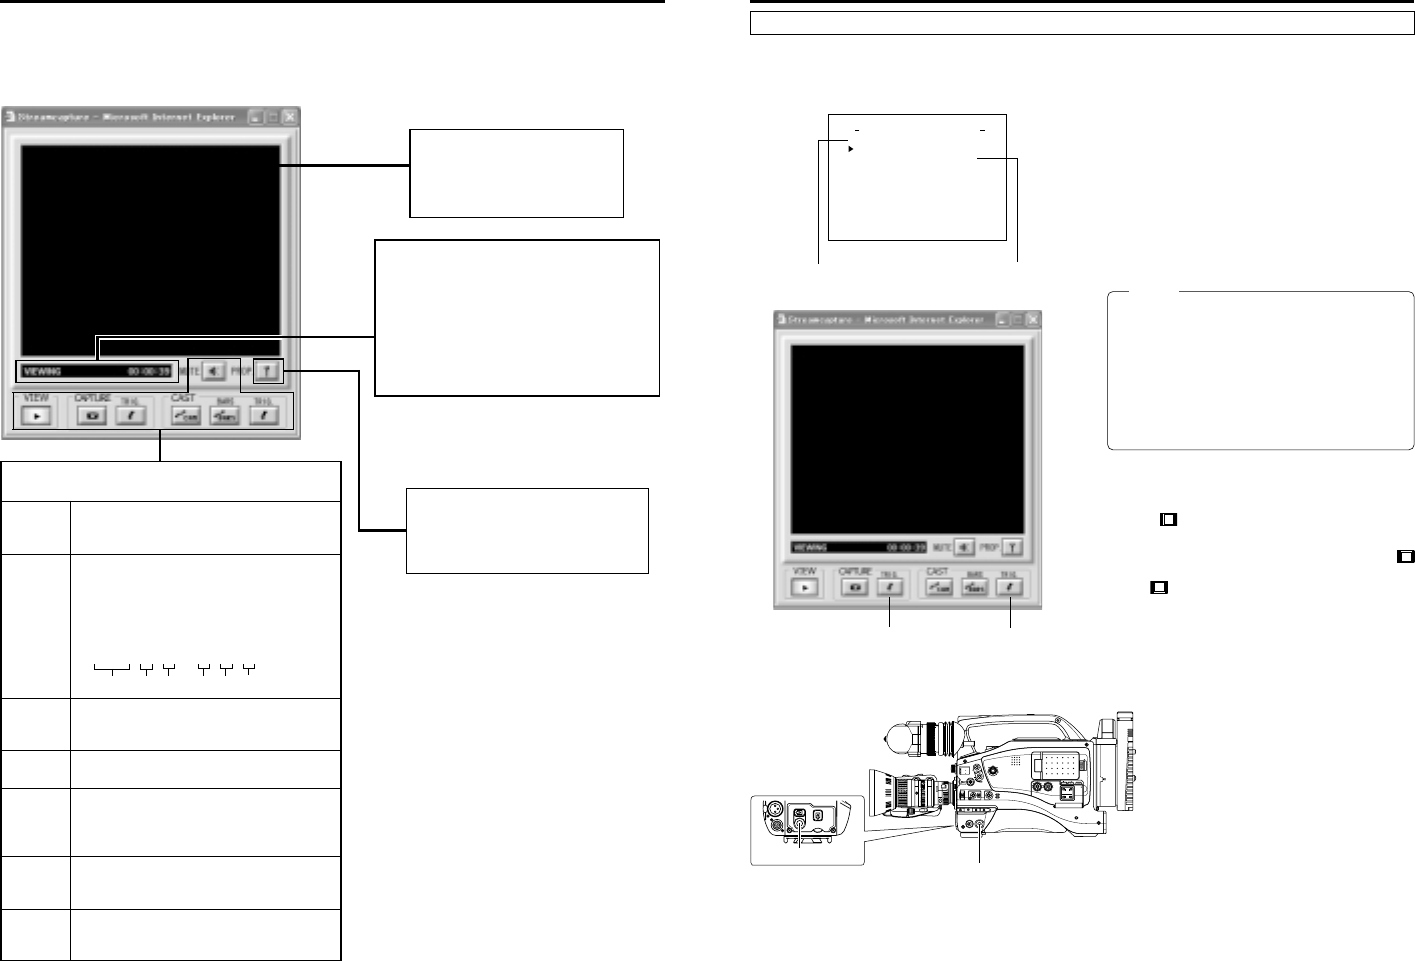
STREAMCAPTURE screen (Playing back video/audio using a PC and saving to file)
Video display
The display size can be changed in the
Property dialog box.
(☞ page 39)
Clicking the button will display the Property
dialog box.
Video display size and the save destination
folder can be changed. (☞ page 39)
Status/Time elapsed display
●The current status is displayed.
VIEWING
: Video or audio from KA-DV5000 is being
played back in realtime (live display).
CAPTURING
: Video or audio is being saved in your PC.
STOP: Playback is stopped.
WAITTING
:TRIG recording standby.
Clicking STREAMCAPTURE on the left of the Streamcorder screen displays the Streamcapture screen shown below.
Video and audio sent from KA-DV5000 via LAN can be played back on your PC in the Streamcapture screen or data can be saved to files.
It can be used on a PC that has Streamproducer installed.
* Since video on the STREAMCAPTURE screen is converted video data, images will take more time to appear than the actual video taken with GY-
DV5000.
→
OVER
Year Month Day Hour Minute Second
Operation buttons ––– Clicking will start operation. When on, the
button will light.
VIEW Click to play back or stop video/audio from KA-
DV5000 on your PC. (ON when the Streamcapture
screen is opened.)
CAPTURE Click to save video or audio to a PC.
Default destination
My Document¥Streamcorder (¥IPAddress)
Saved file name:
The file name based on the capture start time
will be used.
20020304 – 153000.asf
CAPTURE-TRIG.
Click when saving the video/audio from
KA-DV5000 to your PC when starting recording
with GY-DV5000. (☞ page 37)
CAST-CAM Click when sending the video/audio from
KA-DV5000 to another PC. (☞ page 37)
CAST-BARS
Click when transmitting color bars rather than video
from KA-DV5000. (Video from KA-DV5000 will be
displayed in the video display of the Streamcapture
screen. Color bars will not be displayed.)
CAST-TRIG. Click when sending the video/audio from KA-
DV5000 to another PC when starting recording
with GY-DV5000. (☞ page 37)
MUTE Click to turn on/off the mute setting.
When on, the playback sound will be muted.
37
Network pack setup
STREAMCAPTURE screen (Playing back video/audio using a PC and saving to file)
The Trigger Mode function can be used to save and transmit video/audio from KA-DV5000 to your PC by synchronizing to the button
operations of GY-DV5000.
NETWORK SET menu screen
(☞ page 10)
NETWORK PACK CONFIG
menu screen
NET WORK T . .
..
..
SE
ORTWENKACK
P
ON
C
IG
F
ENCODE SET
MPEG REC
T
RGI
MOV I E
C
LI
PS
ET
MENU RES ET CANCEL
PAGE B
A
CK
Setting
MONITOR
EDITSEARCH
FILTER
STATUS
SHUTTER
MENU
AUTO IRIS
BACK L
NORMAL
SPOT L
STRETCH
NORMAL
COMPRESS
FULL AUTO BLACK LOLUX
MODE
POWER
ON OFF
VTR
OPEN
VTR
CAM
1
3200K
5600K
5600K
5600K
ND
/
/
ND
2
.3
.4
1
8
1
64
CH-1
AUDIO INPUT
AUDIO SELECT
CH-2
CH-1 CH-2
FRONT
REAR
AUTO
MANUAL
AUDIO
LEVEL
CH-1 CH-2
PULL
OPEN
LCDBRIGHT DISPLAY
ZEBRA
AUDIO
LEVELE CH-1
OFF
ON
SKIN
AREA
AUTO
WHITE
ACCU
FOCUS
VTR
5
NETWORK
PACK
KA-DV5000
POWER
SUPPLY
ONOFF
<GY-DV5000 rear>
About the Trigger Mode function (TRIG)
CAPTURE-TRIG.
button
CAST-TRIG.
button
1.
Set MPEG REC in the NETWORK PACK CONFIG menu to
“TRIG” or “SPLIT” using steps 1 ~ 9 of page 8.
● TRIG: Records/transmits video/audio streaming data to
your PC at the same time as the recording to the DV cas-
sette tape set in GY-DV5000.
● SPLIT: Records/transmits video/audio streaming data to
your PC regardless of whether the DV cassette is set.
2.
Click the CAPTURE-TRIG./CAST-TRIG. button in the
Streamcapture screen.
● Button lights and the program enters the trigger standby
mode.
Memo
● When the CAPTURE-TRIG. button is on:
Saves the video/audio from KA-DV5000 to your PC by
synchronizing to the button operations of GY-DV5000.
● When the CAST-TRIG. button is on:
Transmits video/audio from KA-DV5000 to another PC
by synchronizing to the button operations of GY-DV5000.
* When saving and transmitting video/audio at the same
time, light both CAPTURE-TRIG. and CAST-TRIG. but-
tons.
3.
Press the VTR trigger button of GY-DV5000.
● When the MPEG REC item is set to “SPLIT”, only the VTR
trigger button on the side panel is effective.
● A red
e
mark appears on the GY-DV5000 LCD screen
and recording/sending to the PC starts.
4.
Press the VTR triggerbutton of GY-DV5000 while the red
e
mark is displayed.
● The
e
mark on the LCD screen of GY-DV5000 turns white
and recording/sending to the PC stops.
VTR trigger button
VTR trigger switch


