


47
Network remote control Controlling the BR-DV6000/SA-DV6000 via a network
With the Network Pack, BR-DV6000/SA-DV6000 can be controlled via LAN.
It is also possible to playback video and audio from SA-DV6000 on your PC in the STREAMCAPTURE screen in realtime (live display)
as well as save data to files.
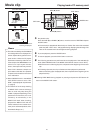
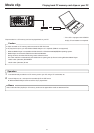
Peer-to-peer connection that directly connects the unit with a PC is explained here.
?X
OK
Cancel
Enter Network Password
Please enter tour authentication information.
Resource
secured
Save password?
User name:
Password:
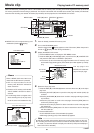
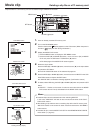
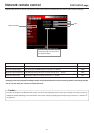
Set the LAN card driver by following the instructions on
manual provided by the card manufacturer.
Socket Com: EA2900-117 (USA)
EA2903-162 (Europe)
EA2906-194 (Asia)
(CF memory card adapter (PCMCIA TYPE I/II specifications)
(sold separately) is required for inserting this card.)
VIDEO
LINE
IN
OUT
MONITOR
OUT
DC12V
DV
IN/OUT
IN OUT
OFF
AUDIO
REMOTE2
IN
B-YR-Y
SYNC IN
TIME CODE
IN OUT
Y
COMPONENT
OUT
CH 1/3 CH 2/4
IN
OUT
MONITOR
OUT
REMOTE1
TIMER
REC PLAY
SERIAL
REMOTE
SIGNAL
GND
Y/C
LAN
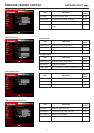
● There are the 3 types of users for Web access:
● Users referred as “jvc” (can be changed) that can perform all operations, “ENCODE” users that can view all data but only change the
encoding settings, and “BROWSE” users that can only view data.
● The default password for each user type is “sa-dv6k” for “jvc” users, first 4 characters of the password set for “jvc” users for “ENCODE”
users (default is “sa-d”) and fixed password of “sa-dv” for “BROWSER” users.
● The following is an explanation when login is made a user permitted with all operations. In the case of other users, the OK button and
Cancel button will be disabled even if operations on the screen are allowed.
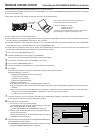
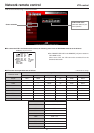
1.
Turn your PC and BR-DV6000 power off.
2.
Insert the PCMCIA LAN card to specify into SA-DV6000.
If you do not own a LAN card, the LAN terminal may be used instead.
3.
Connect the unit and PC using a 10/100 BASE-T cross cable.
4.
Turn the PC and BR-DV6000 power on.
5.
Insert a recordable DV cassette tape or a pre-recorded DV cassette tape.
6.
PC settings
● Set the LAN card driver according to the manual provided by the card manufacturer.
● Network settings (
☞
page 12)
q Set the following items in the TCP IP properties:
* DHCP server is not used.
IP address: 192.168.100.101
Subnet mask: 255.255.255.000
w Setting the proxy server.
● Set the proxy server using the “LAN SETTINGS” of Windows.
● When using peer-to-peer communication that directly connects the PC and SA-DV6000, deselect the “Use a proxy server”
checkbox.
● When the “Use a proxy server” setting must be enabled due to a LAN environment (in-company LAN, etc.), click “Advanced...”
and input the IP address of BR-DV6000 in “Exceptions” of the “Use a proxy server” setting.
(
☞
“About proxy servers,” Page 27)
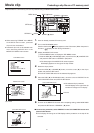
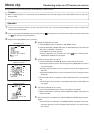
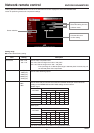
7.
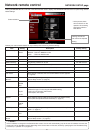
Launch the browser on your PC and enter 192.168.100.101 (default factory setting) in the address bar and press ENTER.
● A confirmation window for user ID and password appears.
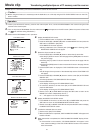
8.
Input the user ID and password.
q For the user ID, input “jvc” (factory setting).
For the password, input “sa-dv6k” (factory setting) or the name
set in the SERVER SETUP menu screen.
(
☞
HTTP USER NAME, HTTP PASSWORD on page 14)
w Check to make sure the inputted user ID and password are cor-
rect and click the OK icon.
(Check “Save password” so that the password does not need to
be inputted for future accesses.)
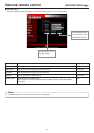
9.
If the user ID and password are correct, the NETWORK PACK SETUP
screen appears on the PC monitor.
● BR-DV6000/SA-DV6000 settings and operations can be controlled
using the NETWORK PACK SETUP. (
☞
page 49)
PC
10/100 BASE-T
cross cable
→
OVER