IMPORTANT: BEFORE OPENING THE BOX CONTAINING THE
XENON BULB, NOTE THE FOLLOWING PRECAUTIONS: The
Xenon bulb contains gas under pressure. Care should be taken in
handling the bulb to avoid injury.
Wear protective clothing such as gloves, long-sleeved shirt, face
and eye covering to protect against flying glass in the event of bulb
breakage.
Handle the bulb only by the ends. Natural skin oils from hands
may damage the quartz envelope.
Always allow the bulb to cool before handling.
When necessary, clean the bulb with ordinary rubbing alcohol
(only when the bulb is cool).
Place the bulb on a soft, secure surface away from table edges.
Never operate the bulb with the lamp cover off. Do not permit
light from the bulb to fall directly on skin or clothing. The Light
from the Xenon bulb is rich in ultraviolet rays similar to direct sun
rays. This could burn the skin and bleach clothing. Do not look
at the bulb directly while it is on. The light emerging from the
projector lens is safe as long as common sense is exercised.
If you have any questions regarding the installation of the Xenon
lamp, please call Navitar at 1-800-828-6778.
4. Gently lift off the lamp house top cover. Unhook the white
connector and place the cover on the table, out of your way.
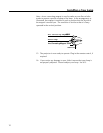
5. If you are replacing your lamp (if not, Skip to 36), remove the screw
which attaches the positive terminal of lamp. This is the black
assembly above the mirror labeled LAMP. Loosen and remove the
lens cap which attaches the negative terminal of the lamp to the
mirror holder. Take out the old lamp while holding the end cap.
6. Your Navitar Xenon 560 or 750 watt slide projector has been pre-
aligned at the factory to be compatible with the enclosed bulb. For
optimum illumination and ease of installation, please install as
follows. If you look at the Xenon bulb itself, you will see that there
is a pointed section of the bulb near the center of the quartz enve-
lope. Please be careful to install the bulb so that this point is facing
upwards at 12 oclock. If the point is placed at any other spot, itwill
take you longer to properly align your bulb. Remove the bulb from
the box by firmly holding the positive wire end post of the bulb.
Installing a New Lamp
9


