


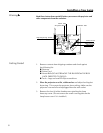

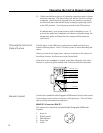

7. While holding the positive wire end post firmly, remove the end cap
and washer (if supplied) from the bulb. Insert the screw end of the
bulb into the center of the reflector and through the hole to the back
side of the reflector. Make sure the bulb does not touch either side
of the reflector. Make sure to include the washer and black wire
and screw on the end cap in order to secure the bulb.
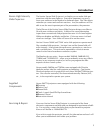
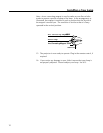
8. Unscrew the positive wire screw from the black assembly above the
mirror labeled LAMP. Insert the screw through the positive wire
closed ring (connector) of the lamp. Locate the screw hole labeled
LAMP above the mirror and tighten down the screw.
Be careful not to lose the screw. It is important that the positive
wire from the lamp is firmly attached in order to achieve proper
contact.
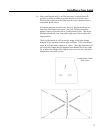
The positive lead wire of the lamp should be kept 10-15mm or
more away from any part, including the filter. A closer distance may
cause the leakage of high tension and result in non-ignition of the
lamp, especially for an old lamp.
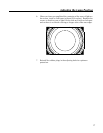
The gas evacuation tip of the lamp should be positioned upwards
at 12 oclock.
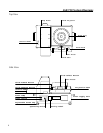
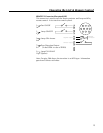
9. Replace the lamp house top cover. Reconnect the white connector
and replace the four (4) white thumbscrews.
10. Plug the power cord into the projector socket and suitable line
outlet (120v, 60 Hz). Turn the power on/off switch to on. Note that
the green power-on indicator should be on.
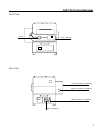
11. Turn the projector on by turning on the round operating switch.
Rotate the round operating switch first clockwise to the center
position, then to the lamp on position. The lamp should start to
glow. It will take a few seconds to come up to full brilliance. If you
hear a clicking sound, but the bulb fails to strike, check to make
sure that the positive wire is securely tightened down.
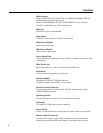
12. In order to see an image projected from the projector, it will be
necessary to open the shutter in the slide projector. To do this,
insert a slide into the slide film gate (the slot on top of the projec-
tor). An empty slide holder without film or glass is best for lamp
adjustment purposes.
13. If your Xenon projector is a 560/750DM, the blades of the Dissolve
Module may have to be opened . See the section called Connecting
the Dissolve Interface Unit to the Dissolve Module.
Installing a New Lamp
10