


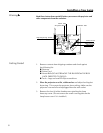
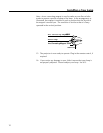

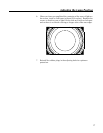


The lamp can be positioned for uniform screen illumination by adjusting
the screws with a screwdriver through three (3) holes on the side of the
lamp house.
1. Position the projector so the light from the lens is directed onto a
reasonably good screen.
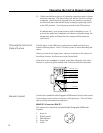
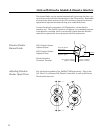
2. Facing the projector from the rear, three (3) adjustment holes are
located on the lamp house covers left side. Remove the rubber
plugs to expose the three (3) adjustment holes.
3. The larger Phillips screwdriver may be inserted through each hole to
adjust the lamp position. The left adjustment (A) will move the light
along a diagonal from top left to bottom right and back. The center
adjustment (B) will move the image up or down. The right adjust-
ment (C) will move the image along a diagonal from bottom left to
top right.
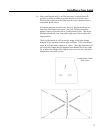
4. Try to adjust the image of the light on the screen for the most even
illumination across the screen. It is best to use an empty slide frame
without film or glass for this adjustment.
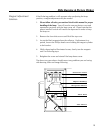
When your lamp is not adjusted properly, it will not produce the best
possible illumination and you might damage your slides or slide mount.
Use the following procedure to reposition the lamp.
1. Turn the lamp and fan on by following the procedure outlined
above. If you have installed a lens on the Xenon projector, remove it
at this time.
2. Using your finger, open the film gate by pressing the slide clamping
mechanism back. The blank slide shutter should pop down and the
screen should be illuminated.
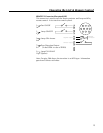
3. By adjusting the three (3) screws on the side of the lamp house top
cover in a clockwise direction, you will be pulling the lamp toward
the elliptical mirror.
4. Try to get a cone of light on the screen. When the cone of light is
visible, reinstall the lens on the Xenon projector.
5. By turning the screws in the proper direction, move the cone of light
so that it is in the middle of the screen area. This may take a little
trial and error, but it can be done.
Lamp Adjustment
Adjusting the Lamp Position
16