


www.kodak.com/go/aiosupport 47
6
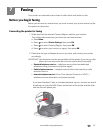
Scanning
Scanning digitizes documents and pictures, and sends the digital files to your
computer.
When you scan, the digital file can:
• Open in Home Center Software (when connected to a computer with
WINDOWS OS)
• Open in a third-party scanner software
• Be saved in a format and location that you determine (see Changing the scan
settings for scanning from the control panel, page 47)
Scanning from a software program on the computer (such as Home Center
Software) gives you more options, but you can also scan from the printer control
panel.
Before you begin scanning
Make sure that the printer is connected to a computer using a USB cable, Ethernet
cable, or wireless network (
see Networking Your Printer, page 5).
Changing the scan settings for scanning from the control panel
Make sure that Home Center Software is installed on the computer. (If not, go to
www.kodak.com/go/aiodownloads, and follow the on-screen instructions to install
the KODAK All-in-One Printer Software.) Then change the scan settings in the
Home Center Software. The printer uses these settings when you scan from the
printer control panel.
1. Open Home Center Software.
2. Select Tools and Documentation (when connected to a computer with
WINDOWS OS) or
Tool s (when connected to a computer with MAC OS).
3. Select Printer Scan Settings.
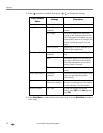
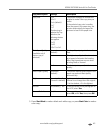
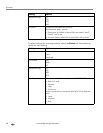
4. Adjust settings for scanning documents and pictures as described below.
To adjust settings for scanning documents, select the Document tab, then select
an option for each setting:
Setting Options
Scan As Black and white
Color
Grayscale
File format .pdf
.rtf (available only when connected to a computer with
WINDOWS OS)
.tif
.jpg
.bmp (available only when connected to a computer with
MAC OS)