


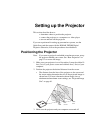


Setting up the Projector
17
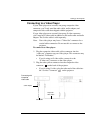
Starting the Projector
Note: We recommend using a surge protector power strip.
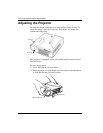
1. Remove the lens cap.
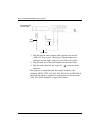
2. Plug the power cord into the side of the projector, and then plug it
into your electrical outlet.
The fans start to run and the lamp LED on top of the projector
lights orange until the software has initialized. Then the LED
lights green.
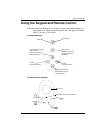
3. Turn on the lamp by pressing the button on the keypad.
The KODAK startup screen appears.
4. If you connected the projector to a video player, turn on the video
player.
• The video image should appear on the projection screen. If a
computer source is active, press the button on the
keypad (page 23) or the button on the remote to display
your video image. You can select a default source to
determine which source the projector examines first during
power-up for active video; see “Default Source” on page 31.
• Use the
buttons to adjust the volume.
5. If you connected the projector to a computer, turn on the
computer. Make sure the computer external video port is
activated. See “Portable and Laptop Activation Chart” on page 49.
Note: With some computers, the order in which you power up
the equipment is very important. Most computers should
be turned on last, after all other peripherals have been
turned on. Refer to your computer documentation to
determine the correct order.
• The computer image should appear on the projection screen.
If a video source is active, press the button on the
keypad (page 23) or the button on the remote to display
your computer’s image.
• If necessary, make adjustments to the image using the
projector’s on-screen menus. To open the menus, press the
button on the keypad or remote, then select the Display
or Image sub-menu. For more information about the menus,
see “Using the On-Screen Menus” on page 25.