


2
Setup items by operation
2-194 bizhub C203/C253/C353
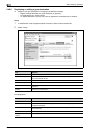
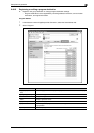
When "IP Address Fax" was selected using [Registration]
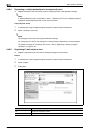
Item Definition
No. Displays the registration number.
Name Type in the registration name (up to 24 characters).
Destination Information Specify the address information.
Select "Select from Address Book" or "Direct Input".
Resolution Specifies the resolution.
File Type Specify the file format.
Simplex/Duplex Specify whether the original is 2-sided.
Original Type Specify the quality of the original, such as text or photo.
Color Specify the color mode for scanning.
Separate Scan Specify whether to divide scanning of the original.
Density Specify the density.
Background Removal Adjust the density of the background.
Scan Size Specify the original size ("Auto", "Standard Size" or "Custom Size").
If "Standard Size" is selected, select the size and the feed direction. If "Custom Size" is
selected, specify the height and width.
Application Setting Click the [Display] button, and then specify settings for the functions that are displayed.
Password TX Specify whether to send the password. If yes, enter the password.
F-Code Specify whether to send the password using F code. If "Enable" is selected, type in the
SUB address and password.
2-Sided Binding Direc-
tion
Specify the binding orientation of the original.
Special Original Specify the original in a different size.
Erase Specify whether to perform frame erase.
Compose
(Date/Time)
Specify whether to print the date/time.
If yes, specify settings for "Date Type", "Time Type", "Print Position", "Fine-Tune", "Color"
"Pages", and "Size".
Compose
(Page)
Specify whether to print page numbers.
If yes, specify settings for "Page Number", "Chapter", "Print Position", "Fine-Tune",
"Color", and "Size".
Compose
(Header/Footer)
Specify whether to print a header/footer.
If yes, specify the registration number of the header/footer. To check the registered head-
er/footer, click [Confirm Registered Contents].
Compose
(Stamp)
Specify whether to print the stamp.
If yes, specify settings for "Preset Stamp" or "Registered Stamp", "Print Position", "Fine-
Tune", "Color", "Pages", and "Size". To check the registered stamp, click [Confirm Reg-
istered Contents]. To use the registered stamp function, stamps must be registered from
the control panel in advance.
Stamp Combine Method Specify the stamp composition method.
Limiting Access to Desti-
nations
Click [Display], and then specify the group that is allowed to access a destination and ref-
erence allowed level.