


C.4. RS-232C Cable Connection
C-8
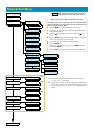
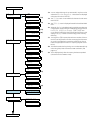
Connecting the Printer to the Computer
1.
Check that the power of both the printer and computer is switched off.
2.
Discharge yourself by touching a metal object such as a doorknob.
3.
Remove the plastic cap from the printer's RS-232C interface connector.
4.
Plug the printer end of the RS-232C interface cable into the printer's RS-232C connector and screw it in
place.
5.
Plug the other end of the cable into the computer's RS-232C interface connector.
6.
Switch on the printer's power.
7.
The printer's RS-232C parameters are factory-set to the following values:
Baud rate=9600 bps, Data bits (character length)=8 bits, Stop bits=1, Parity=None
The three RS-232C protocols are XON/XOFF and DTR. The printer performs all three of them simulta-
neously, using positive logic for DTR.
8.
Set the computer to the same parameters as the printer. On many computers this can be done by setting
DIP switches before power is turned on. Another method is as follows:
In DOS, enter the following commands:
C:\>MODE COM1:96,N,8,1,P
C:\>MODE LPT1:=COM1
To test the interface, then enter:
^P (Press the P key while holding down the Ctrl key.)
C:\>DIR
^P (Press the P key while holding down the Ctrl key.)
The software settings made by the procedures above are temporary. On most computers, permanent
settings must be made with DIP switches.
If you want to use a different baud rate or change any of the other RS-232C parameters, you can use the
printer's FRPO (firmware reprogram) command. See the Programming Manual for details.