


Installing or removing the Ethernet card
Attention: Do not open your server or attempt any repair before reading and understanding “Safety information”
on page iii
and “Guidelines” on page 35.
This section provides instructions on how to install or remove the Ethernet card. Use any documentation that
came with the Ethernet card and follow those instructions in addition to the instructions in this section.
To install or remove the Ethernet card, do the following:
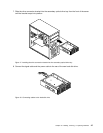
1. Remove all media from the drives and turn off all attached devices and the server. Then, disconnect all
power cords from electrical outlets and disconnect all cables that are connected to the server.
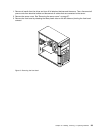
2. Remove the server cover. See “Removing the server cover” on page 37.
3. Lay the server on its side for easier operation.
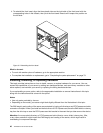
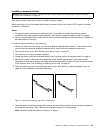
4. The Ethernet card is a kind of PCI card. See “Installing or replacing a PCI card” on page 56 and follow
those instructions to install or remove the Ethernet card.
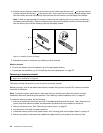
5. If you are instructed to return the removed Ethernet card to the manufacturer, follow all packaging
instructions and use any packaging materials that are supplied to you for shipping.
If you are using the Microsoft Windows operating systems, you need to install the device driver for the
Ethernet card. To install the device driver on Windows operating systems, do the following:
1. Save any open documents and exit all applications.
2. Insert the ThinkServer EasyStartup DVD that came with your server into the DVD drive.
Note: You do not need to use the driver disc that came with the Ethernet card.
3. Right-click My Computer and select Properties. The System Properties window opens.
4. On the Hardware tab, click the Device Manager button. The Device Manager window opens.
5. Expand Network adapters and then right-click one of the Ethernet cards (PRO/1000PT or the yellow
question mark).
6. Select Update Driver.... The Hardware Update Wizard program opens.
7. Select Install the software automatically (Recommended) and click Next to continue.
8. Follow the instructions on the screen.
What to do next:
• To work with another piece of hardware, go to the appropriate section.
• To complete the installation, go to “Completing the parts replacement” on page 79.
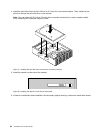
Installing or removing a memory module
This topic provides instructions on how to install or remove a memory module.
Note: The memory modules are extremely sensitive to ESD. Make sure that you read and understand
“Handling static-sensitive devices” on page 36 rst and carefully perform the operation.
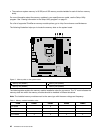
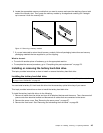
Memory module installation rules
Your server has four memory slots and it has the following features:
• Each slot supports 2 GB and 4 GB DDR3 unbuffered dual inline memory modules (UDIMMs) with Error
Checking and Correcting (ECC) technology.
• The minimum system memory is 2 GB (only one 2 GB memory module installed in the DIMM2 slot).
Chapter 6. Installing, removing, or replacing hardware 41