


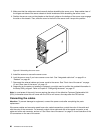


3. Make sure that the cables are routed correctly before reinstalling the server cover. Keep cables clear of
the hinges and sides of the server chassis to avoid interference with reinstalling the server cover.
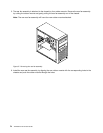
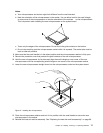
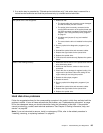
4. Position the server cover on the chassis so that the rail guides on the bottom of the server cover engage
the rails on the chassis. Then, slide the cover to the front of the server until it snaps into position.
Figure64. Reinstalling the server cover
5. Install the screws to secure the server cover.
6. Lock the server cover if you have a server cover lock. See “Integrated cable lock” on page 81 or
“Padlock” on page 81.
7. Reconnect the external cables and power cords to the server. See “Front view of the server” on page
12 and “Rear view of the server” on page 13.
8. Depending on the parts you installed or replaced, you might need to conrm the updated information in
the Setup Utility program. Refer to Chapter 5 “Conguring the server” on page 21
.
Note: In most areas of the world, Lenovo requires the return of the defective Customer Replaceable Unit
(CRU). Information about this will come with the CRU or will come a few days after the CRU arrives.
Connecting the cables
Attention: To prevent damage to equipment, connect the power cords after completing the parts
replacement.
If the server cables and connector panel have color-coded connections, match the color of the cable end
with the color of the connector. For example, match a blue cable end with a blue panel connector, a red
cable end with a red connector, and so on. See “Rear view of the server” on page 13
for an illustration of the
I/O connectors on the rear of the server.
80 ThinkServer TS140 User Guide