


g Click OK.
h Click Close on the Printer Ports dialog.
i Make sure the new port is selected on the Ports tab, and then click Apply.
The new port is listed with the printer name.
j Click OK.
Sharing a printer in a Macintosh environment
1 From the Apple menu, choose System Preferences.
2 From the menu bar, click Help System Preferences Help.
3 In the Search field, type sharing the printer on a network, and then press return.
4 To let other Macintosh computers on the network that use Mac OS X version 10.3 or later use any printer connected
to your Macintosh computer, double-click Sharing your printer with Mac OS X users.
or
To let Windows computers on the network use any printer connected to your Macintosh computer, double-click
Sharing your printers with Windows users.
5 Follow the instructions on the computer screen.
Note: Windows users should see the Windows documentation for information on adding a network printer
connected to a Macintosh computer.
Installing the printer on an Ethernet network
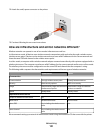
Information you will need to set up the printer on an Ethernet
network
To configure your printer for an Ethernet network, organize the following information before you begin:
Note: If your network automatically assigns IP addresses to computers and printers, continue on to installing the
printer.
• A valid, unique IP address for the printer to use on the network
• The network gateway
• The network mask
• A nickname for the printer (optional)
Note: A printer nickname can make it easier for you to identify your printer on the network. You can choose to
use the default printer nickname, or assign a name that is easier for you to remember.
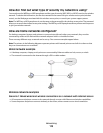
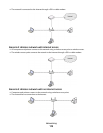
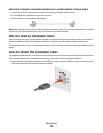
You will need an Ethernet cable to connect the printer to the network and an available port where the printer can
physically connect to the network. Use a new network cable when possible to avoid potential problems caused by
a damaged cable.
Networking
115