


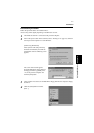

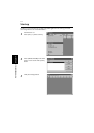
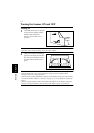

Image acquisition screen
4-8
PS7000 ISIS Driver
Chapter 4
1. Dot per inch: Set the resolution of the image output.
Refer to “Selecting resolution” on page 5-38 for details.
2. Paper Size: Set the size of the original to be read.
Refer to “Selecting scan size” on page 5-39 for details.
3. Brightness: Select [Automatic] or [Manual].
Brightness is adjusted manually when [Manual] is selected.
4. OK: Validates the settings.
5. Default: Initializes all the set values.
6. Cancel: Exit the image acquisition screen.
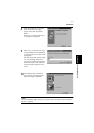
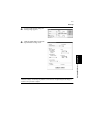
7. Scan Mode: Select [Spread] (scanning both pages), [Single] (scanning
either right or left page only), or [Book Split] (scanning right
and left pages separately).
Refer to “7. Page key” on page 2-8 for details.
8. Frame Masking: Objects outside the original are erased to prevent a
shadowed (black) frame being created in the image, i.e.
when the paper selection is larger than the original.
This function is effective only in Book mode.
Refer to “Frame Masking (Masking)” on page 5-32 for
details.
9. Finger Masking: The image of the fingers holding the original is removed
from the scanned image. This function is effective when
[Frame Masking] is selected in Book mode.
Refer to “Finger Masking (Fing Mask)” on page 5-33 for
details.
10. Centering: Any shift away from the center of the original is corrected
and the scanned image is placed in the center of the screen.
This function is effective when [Frame Masking] is selected
in Book mode.
Refer to “Centering (Centerin)” on page 5-35 for details.
11. Center-line Erase: The shadow generated in the center of the open book is
erased during scanning.
[Automatic Detection] automatically determines the center
of the original. This is effective only in Book mode.
The center of the book table is regarded as the center of
original when [Center Fixed] is selected.
The erasing range (width) can also be adjusted.
Refer to “Center Erase (Cent Erase)” on page 5-31 for
details.