When designing formats, keep in mind the following non-print
zones for the 9403 printer:
Bottom .035 inches at the beginning of the label.
Left .10 inches from the left edge of the label.
The following non-print zones are recommended for the 9800
series printers:
All Supplies .050 inches on either edge of the label.
All Supplies .020 inches at the end of the label.
If using the optional verifier, allow a minimum no-scan zone at the
top of the label of 1.3" (33 mm) for speeds 6.0 ips or less; 1.8"
(46 mm) for 8.0 ips; and 2.2" (56 mm) for 10.0 ips.
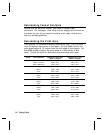
Use the following formulas to convert inches to dots and metric:
Dots = inches x 203 (or 300 dots per inch)
Metric (1/10mm) = inches x 254
English (1/100 inch) = 100 x (dots/203) or (dots/300)
Dots = Metric (1/10 mm) x 799/1000 (or 1181/1000)
300 dpi depends on your printer.
Drawing Rough Sketches
After you decide what information you want to print, sketch how
you want the information to appear on the label. Note any areas
that are preprinted on the label, such as a logo.
As soon as you know what information to include
on the label, and you have a rough sketch, you
can use a supply layout grid to help you layout
and size your label. If you do not want to use a
grid, go to "Considering Field Types" to choose
what information you want on your label.
Getting Started
1-7


