


100
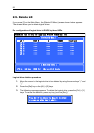
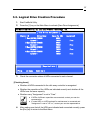
8. After completing the setting items, select HDDs used for logical drives to be
created in [Devices Assignments]. Move the cursor to a targeting HDD by using
the arrow keys "↑" and "↓" and press the [Space] key. The change of [Assignment]
from "N" to "Y" indicates that the HDD is assigned to the logical drive.
9. After completing all the settings of the logical drive, press the [Ctrl] + [Y] keys to
save the configuration information.
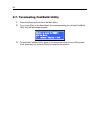
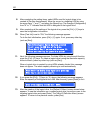
10. When [Fast Init] is set to "ON," the following message appears.
To do the fast initialization, press [Ctrl] + [Y] again. If not, press any other key
(such as [Esc]).
Fast Initialization Option has been selected.
It will erase the MBR data of the disks.
<Press Ctrl-Y Key if you are sure to erase it>
<Press any other key to ignore this option>
11. Next, the following message appears. To divide HDDs by using the split function,
press the [Ctrl] +[Y] keys. To create a logical drive having the maximum capacity
without division, press any other key (such as [Esc]).
When a logical drive is created by using HDDs already divided, this message
does not appear. The whole capacity remaining is used automatically.
Press Ctrl-Y to Modify Array Capacity or press any
Other key to use maximam capacity...
12. If you press the [Ctrl] + [Y] keys in (11) above, the following message appears.
Enter the capacity of the logical drive in MB. After the entry, press [Enter] to fix it.
Enter array capacity (in MB) here: 80000_
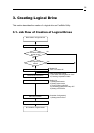
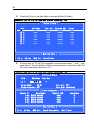
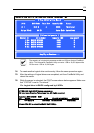
13. After the creation of the logical drive, the [Define LD Menu] screen shown below
appears. To see the information on a created logical drive, move the cursor to the
targeting logical drive and press [Enter]. The [View LD Definition Menu] screen
appears. To return to the previous screen, press [Esc].