


June 2004 NEC Business Solutions Ltd
62 - Chapter 5 Upgrading the Voice Messaging System
Doc. No. 8557 - Release 1.1
June 2004
S
ECTION
2
ADDING SYSTEM
LANGUAGES AND
PROMPTS
Perform the following steps to add system languages and prompts.
You can also use these steps to change your default system language or
remove a language and replace it with another selection. An upgrade file is
not required for such tasks.
Steps for adding a language
1 Configure the voice messaging system software to use additional languages
and prompts.
See the procedure, “To add or update system languages and prompts” on
page 62.
2 Back up the voice messaging system.
See “Using the backup and restore utilities” on page 41.
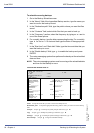
To add or update system languages and prompts
1 Shut down the voice messaging system application by pressing ESC at
the Banner screen and then following the system prompts.
2 If you haven’t already done so for this upgrade, transfer the upgrade file
from the support computer to the C:\ directory (root) on the voice
messaging system hard drive. See “Transferring files” on page 37.
3 To open an OS/2 command prompt from the voice messaging system
screens, do one of the following:
• If you are using a monitor, keyboard, and mouse plugged into the voice mes-
saging system board to access the voice messaging system screens, go to
the OS/2 desktop and select the OS/2 Window icon.
• If you are using a remote access connection to access the voice messaging
system screens, switch to the
OS/2 Host Process Switcher window.
0 to choose “Start a new 0S/2 text
session” and press ENTER.
4 At the OS/2 command prompt, f: and press ENTER.
5 cd \ and press ENTER.
6 setup and press ENTER.
7 y to proceed with the voice messaging system Setup utility.
8 From the Setup menu, 1 to choose “Add new features” and press
ENTER.
9 Press ENTER to confirm that the voice messaging software is installed
on drive E.
10 Press ENTER to confirm that the voice messaging software is installed
in the Vmail directory.
11 From the Upgrade Code menu,
1 to use the upgrade file you copied to
the C:\ directory and press ENTER.
12 Press ENTER to confirm that the upgrade file is located in the C:\
directory.