


Mediant 2000 SIP
Mediant 2000 SIP User’s Manual 208 Document #: LTRT-72504
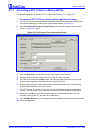
2. In the URL field, append the suffix ‘AdminPage’ (note that it’s case-sensitive) to the IP
address, e.g., http://10.1.229.17/AdminPage.
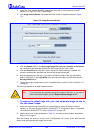
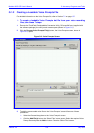
3. Click Image Load to Device; the Image Download screen is displayed (shown in Figure
F-3).
Figure F-3: Image Download Screen
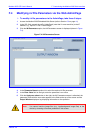
4. Click the Browse button in the Send Logo Image File from your computer to the Device
box. Navigate to the folder that contains the logo image file you want to load.
5. Click the Send File button; the file is sent to the device. When loading is complete, the
screen is automatically refreshed and the new logo image is displayed.
6. Note the appearance of the logo. If you want to modify the width of the logo (the default
width is 339 pixels), in the Logo Width field, enter the new width (in pixels) and press the
Set Logo Width button.
7. To save the image to flash memory so it is available after a power fail, refer to Section
5.12
on page 84.
The new logo appears on all Web Interface screens.
Tip: If you encounter any problem during the loading of the files, or you want to
restore the default images, click the Restore Default Images button.
To replace the default logo with your own corporate image via the ini
file, take these 2 steps:
1. Place your corporate logo image file in the same folder as where the device’s ini file is
located (i.e., the same location defined in the BootP/TFTP configuration utility). For detailed
information on the BootP/TFTP, refer to
Appendix B on page 189.
2. Add/modify the two ini file parameters in Table F-1 according to the procedure described in
Section
6.2 on page 87.
Note that loading the device’s ini file via the ‘Configuration File’ screen in the Web Interface
doesn’t load the corporate logo image files as well.