


Basic operations using the remote control
ENGLISH - 39
Basic Operation
Using the automatic setup
function
The automatic setup function can be used to
automatically adjust the resolution, clock phase, and
picture position when analog RGB signals consisting
of bitmap images such as computer signals are
being input, or to automatically adjust the picture
position when DVI-D/HDMI signals are being input.
(Automatic setup does not work for a movie format
signal such as an output signal of the DVD player.) It
is recommended to supply images with a bright white
border at the rims and characters with high contrast
black and white, when the system is in the automatic
adjustment mode.
Avoid supplying images that include halftones or
gradation, such as photographs and computer
graphics.
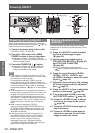
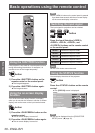
button
Press the <AUTO SETUP> button on the
remote control or the control panel.
z
[COMPLETE] is displayed when it has
completed without any problem.
Note
z
The CLOCK PHASE may shift even if it has
completed without any incident. In such cases,
adjust with the [POSITION] menu
[CLOCK
PHASE] (
page 50).
z
If an image with blurred edges or a dark
image is input, [INCOMPLETE] may appear or
adjustment may not be performed properly even
if [COMPLETE] appears. In this case, adjust the
settings in the [ADVANCED MENU] menu
[INPUT
RESOLUTION] (
page 52), [POSITION]
[CLOCK
PHASE] (
page 50), [SHIFT] (
page 48).
z
Adjust specic signals according to the [DISPLAY
OPTION] menu
[AUTO SETUP] (
page 57).
z
Automatic adjustment may not work depending on
the model of the computer.
z
Automatic adjustment may not work for a
synchronization signal of C-SYNC or SYNC ON
GREEN.
z
Images may be disrupted for a few seconds during
automatic adjustment, but it is not a malfunction.
z
Adjustment is required for each input signal.
z
Automatic adjustment can be canceled by
pressing the <MENU> button during the automatic
adjustment operation.
z
Even for an RGB signal for which automatic setup
is possible, if automatic setup is performed while
moving images are being input, [INCOMPLETE]
may appear, or adjustment may not be performed
properly even if [COMPLETE] appears.
Using the FUNCTION button
[DISABLE], [SUB MEMORY], [SYSTEM SELECTOR],
[SYSTEM DAYLIGHT VIEW], [FREEZE], or [SIDE
BY SIDE] operations can be assigned to the
<FUNCTION> button on the remote control so that it
can be used as an easy shortcut button.
button
Press the <FUNCTION> button on the
remote control.
Note
z
[SIDE BY SIDE] can be set up only with
PT-DW730E.
z
Assignment of the button is performed from the
[PROJECTOR SETUP] menu
[FUNCTION
BUTTON] (
page 65).
Displaying the internal test
pattern
The projector has nine types of internal test patterns
to check the condition of the set. To display test
patterns, perform the following steps.
button
1) Press the <TEST PATTERN> button on
the remote control.
2) Press ◀▶ to select the test pattern.
Note
z
Setting is also available from the [TEST PATTERN]
menu (
page 67).
z
Settings of position, size, and other factors will not
be reected in test patterns. Be sure to display
an actual input signal before performing these
adjustments.