


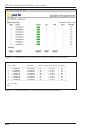


4-1
4. Installation
This section provides further details regarding the connections that are made in
the process of installing the RPS.
4.1. Power Supply Connection
Before you connect the RPS to your power supply, it is recommended to install
the Cable Keepers, which will secure the power supply cables to the RPS unit.
To install the Cable Keepers, first, make certain that both power cables are
disconnected from your power supply. Next, loosen (but do not remove)
the two Phillips head screws located adjacent to each power inlet. Connect
appropriate power supply cables to the RPS’s power inlets, then slip the Cable
Keepers over each supply cable, so the notch on the top of each keeper lines up
with each cable, and the two slots on the bottom of each keeper slide over the
loosened screws. Tighten the Phillips head screws to secure each cable keeper
to the unit, make certain the cables are secure, and then connect the cables to
an appropriate power supply.
RPS830 and RPS1630 units should be connected to a 100 to 120 VAC Power
Supply, and RPS820 and RPS1620 units should be connected to a 208 to 240
VAC power supply. Set the RPS's Master Power Switch in the "On" position.
The Master Power Switch must be "On" in order for the unit to operate.
CAUTIONS:
• This device should only be operated with the type of power
source indicated on the instrument nameplate. If you
are not sure of the type of power service available, please
contact your local power company.
• Reliable earthing (grounding) of this unit must be
maintained. Particular attention should be given to supply
connections when connecting to power strips, rather than
directly to the branch circuit.
• Check nameplate ratings to ensure that there is no
overloading of supply circuits that could have an effect on
overcurrent protection and supply wiring.