


4-2
RPS Series: Remote Power Switches - User's Guide
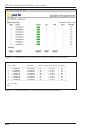
4.2. Connection to Switched Outlets
Connect the power cord from each device that you wish to control, to a
Switched AC Outlet on the RPS unit. Note that when power is applied to the
RPS in the default state, the Switched Outlets will all initially be
switched "ON".
RPS830 and RPS1630 units are designed for 100 to 120 VAC power control;
Power Circuit "A" can switch up to 15 Amps, and Power Circuit "B" can also
switch up to 15 Amps, providing a maximum total load of 30 Amps for
the unit.
RPS820 and RPS1620 units are designed for 208 to 240 VAC power control;
Power Circuit "A" can switch up to 10 Amps, and Power Circuit "B" can also
switch up to 10 Amps, providing a maximum total load of 20 Amps for
the unit.
4.3. Console Port Connection
The Console Port (COM Port) is a male, RS232C DB9 connector, wired in a
DTE configuration similar to an AT computer. In the default state, the Console
port is configured for 9600 bps, no parity, 8 data bits, 1 stop bit. The Console
Port can be connected to either an external modem or a local PC, but not both
items at the same time. Appendix A describes the Console Port interface.
4.3.1. Connecting a Local PC
When connecting the Console Port to a Local PC, note that the port uses a
DTE configuration. After the Local PC has been connected, make certain to
set the Serial Port Mode to "Console" as described in Section 5.3.2.
4.3.2. Connecting an External Modem
When connecting directly to an external modem, use a standard AT Style
to Modem cable. Make certain that the modem is initialized to the same
default communications parameters as the RPS Console Port. Next, refer
to Section 5.3.2 and set the Serial Port Mode to "Modem". If necessary, you
may also wish to redefine the Modem initialization command at this point as
described in Section 5.3.2. Please refer to the modem user’s guide for more
information.