


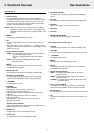
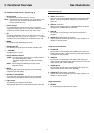
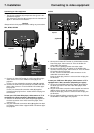

Connecting to video equipment
General
–
The figures in brackets (1) correspond to the figures in the
accessories diagram.
The characters in brackets (a) correspond to the characters in
fig. 2 of ‘Controls and connections’.
Caution!
Always switch off the projector before making any connections.
PAL, NTSC, SECAM
1.
Connect the video OUT socket of a VCR, Laser Disc player,
video camera or TV to the VIDEO IN socket
(e)
of the
projector.
For this, use the video/audio connection cable
(2)
supplied.
2.
Connect the audio OUT L/R sockets of the VCR, Laser Disc
player, video camera or TV to the AUDIO L/R sockets
(f)
of
the projector.
For this, use video/audio connection cable
(2)
supplied.
Insert the white plug into the L socket and the red plug into
the R socket.
In case your VCR, Laser Disc player, video camera or TV is
equipped with a Scart connector (depending on region):
1.
Connect the Scart/RCA Audio Video adapter
(3)
supplied to
the Scart connector of the VCR, Laser Disc player, video
camera or TV.
2.
Plug the video/audio connection cable
(2)
supplied into both
the adapter and the Video in
(e)
and Audio L/R sockets
(f)
of
the projector.
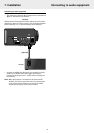
S-VHS
1.
Connect the S-video OUT socket of a S-VHS video recorder,
Laser Disc player, video camera or TV to the S-video IN
socket
(d)
of the projector.
For this use an
(optional)
S-video connection cable.
2.
Connect the audio OUT L/R sockets of the S-VHS video
recorder, Laser Disc player, video camera or TV to the AUDIO
L/R sockets
(f)
of the projector.
For this, use the red and white audio connectors of the
audio/video connection cable.
Insert the white plug into the L socket and the red plug into
the R socket.
In case your VCR, Laser Disc player, video camera or TV is
equipped with a Scart connector (depending on region):
1.
Connect the Scart/RCA Audio Video adapter
(3)
supplied to
the Scart connector of the VCR, Laser Disc player, video
camera or TV.
2.
Plug the audio/video connection cable supplied into both the
adapter and the Audio L/R sockets
(f)
of the projector.
Insert the white plug into the L socket and the red plug into
the R socket.
3.
Plug an
(optional)
S-Video connection cable into the VCR and
the S-VIDEO in socket
(d)
of the projector.
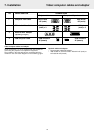
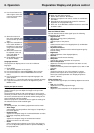
Data in
S-Video in Video in Audio
Audio
LR
Data in
S-Video in Video in Audio
Audio
LR
Power
Data
AudioVideo
out
out
L Audio R
out
S-Video
S-Video
L Audio R
out
VCR
Video
out
Video
out
Projector
Data
USB in USB out
USB in USB out
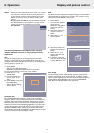
Data in
S-Video in Video in Audio
Audio
LR
Data in
S-Video in Video in Audio
Audio
LR
PowerAudioVideo
out
out
L Audio R
out
Video
out
L Audio R
out
Video
out
VCR
Projector
Data
USB in USB out
USB in USB out
7. Installation
12
Scart adapter
(depending on
region)
(e)
(f)
(2)
(3)
S-Video
Scart adapter
(depending on
region)
(d)
(f)
(optional)
(2)
(3)
Connecting to video equipment