


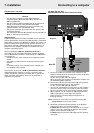

On trackball remote control - optional (fig. 2)
1 On/off button
For switching the remote control on and off.
Note: –
The remote control will always use some power, even
when not in use. Therefore always switch off the
remote control after use.
2 Cursor Control
For manipulating the mouse cursor on the connected
computer as long as the menu is not active. When the menu
is active the Cursor Control controls the menu cursor.
3 OK
For action confirmation in the menu when the menu is on
screen. When the menu is not on screen the – / –– buttons
function as the Left and Right mouse buttons of your PC.
4 MENU
For activating and deactivating the menu.
5 Standby/On/Off
For switching the projector in the power standby mode.
6 – VOLUME +
For adjusting the volume.
7 Source selection buttons
VIDEO – For selecting the video signal or S-video signal as
the current projection source.
The button toggles between video and S-video
signal.
DATA – For selecting the DATA signal as the current
projection source.
8 MUTE
For muting the sound of the projector (or an externally
connected sound amplifier).
9 A(audio)/V(video)-MUTE
For muting the sound of the projector (or an externally
connected sound amplifier) and for muting the picture.
0 Light button
For switching on the button illumination.
The back-light will switch off automatically after 5 seconds.
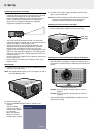
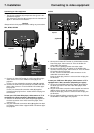
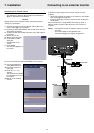
Connections (fig. 3)
Data source connections
a USB in (downstream)
Socket for connecting USB peripherals like a document video
camera, a mouse, a keyboard, a wireless connection box, a
printer etc.
b USB out (upstream)
Socket for connecting a PC or an Apple Macintosh computer
equipped with a USB downlink connection.
c DATA IN
Input socket for connecting to the Data out terminal of a
computer.
g AUDIO OUT (audio output connection)
Output socket for connecting to the Line Input sockets of an
amplifier or stereo system.
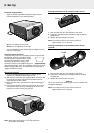
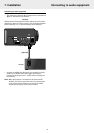
Video source connections
d S-VIDEO IN
Input socket for connecting to the S-VIDEO OUT socket of a
S-VHS video recorder, a VCR, Laser Disc player, video camera
or TV with AV output socket.
e VIDEO IN
Input socket for connecting to the VIDEO OUT socket of a
video recorder, Laser Disc player, video camera or TV with AV
output socket (PAL, NTSC, SECAM).
f AUDIO IN L/R
Input sockets for connection to the Audio OUT sockets of a
video recorder (S-VHS, PAL, NTSC, SECAM).
g AUDIO OUT (audio output connection)
Output socket for connecting to the Line Input sockets of an
amplifier or stereo system.
Other connections
h POWER
For connecting the projector to the mains.
5. Functional Overview
7
See illustrations