


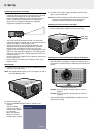
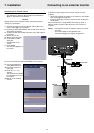

Controls (fig. 1)
On projector
1 Cursor Control
For manipulating the mouse cursor on the connected
computer as long as the menu is not active. When the menu
is active the Cursor Control controls the menu cursor. The
cursor control, by means of the local keyboard, works with
up/down and left/right button operation.
Notes: – The Cursor Control only functions when the USB out
(upstream) socket of the projector is connected to the
USB downstream terminal of the computer (Data 1 and
Data 2).
2 MENU
For activating and deactivating the menu.
3 OK
For action confirmation in the menu when the menu is on
screen.
When the menu is not on screen the – / –– buttons on the
trackball remote control function as the Left and Right mouse
buttons of your PC.
4 Source selection buttons
VIDEO – For selecting the video signal or S-video signal as
the current projection source.
The button toggles between video and S-video
signal.
DATA – For selecting the DATA signal as the current
projection source.
5 MUTE
For muting the sound of the projector (or an externally
connected sound amplifier).
6 Standby/On/Off
For switching the projector in the power standby mode.
7 A(audio)/V(video)-MUTE
For muting the sound of the projector (or an externally
connected sound amplifier) and for muting the picture.
8 – VOLUME +
For adjusting the volume.
9 Indicators
Lamp indicator
– Flashes green when the lamp is starting up.
– Lights up green when the lamp is on.
– Flashes orange when the remaining lamp life is less than
100 hours.
– Lights up orange when the lamp life is expired.
– Lights up red when
• the temperature, measured in the set, is too high, or
• lamp start has failed.
Remote Control indicator
Flashes green when the remote control is operated and the
projector responds to this operation.
0 ZOOM ring
For adjusting the size of the projected image.
! FOCUS ring
For adjusting the focus of the projected image.
@ Horizontal adjusters
For adjusting or correcting a possible oblique displayed
picture.
# Lock slit
For inserting an optional locking device (Kensington lock).
$ IR sensor
Receive the signals from the remote control.
% Dust filter
^ Lens cap
& HEIGHT/LEVEL adjuster
For adjusting the vertical angle of the projector.
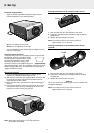
On compact remote control (fig. 2)
1 Standby
For switching the projector in the power standby mode.
2 Left/Right
Function as the Left and Right mouse buttons of your PC.
3 – VOLUME +
For adjusting the volume.
4 MENU
For activating and de-activating the menu.
5 MUTE
For muting the sound of the projector (or an externally
connected sound amplifier).
6 Source selection buttons
DATA – for selecting the DATA signal as the current
projection source.
VIDEO – for selecting the video signal as the current
projection source.
S-VIDEO – for selecting the S-video signal as the current
projection source.
7 A(audio)/V(video)-MUTE
For muting the sound of the projector (or an externally
connected sound amplifier) and for muting the picture.
8 Cursor Control
For manipulating the menu cursor when the menu is active.
9 OK
For action confirmation in the menu when the menu is on
screen.
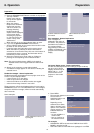
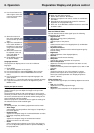
5. Functional Overview
6
See illustrations