


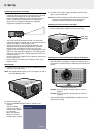

9.
Carefully remove the new lamp housing from its package. Do
not touch lamp or point lamp housing opening at anyone. Do
not drop, as the impact may cause the lamp to break.
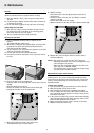
10.
Place the lamp holder in the guiding slots and insert into the
lamp compartment.
11.
Tighten the screws.
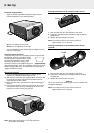
12.
Replace the cover and tighten both the screws and the
horizontal adjusters.
13.
Plug the projector back in by inserting the mains lead in the
POWER socket.
14.
Press the STANDBY/ON/OFF button to switch on the
projector.
15.
Reset the lamp life time (see ‘Resetting the lamplife time’).
16.
Properly dispose of the old lamp.
Note: When replacing the lamp, always use the same type of
lamp (LCA 3109/00, 12NC: 8670 931 09009).
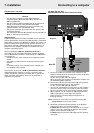
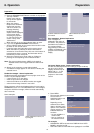
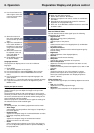
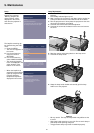
Resetting the lamplife time
1.
Press MENU.
– The menu bar appears on the screen.
2.
Use cursor control to
select SETTINGS in the
menu bar.
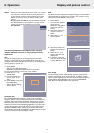
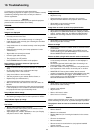
3.
Use cursor control to
select LAMP COUNTER
in the sub menu.
4.
Press OK (–/––) for 3 seconds to reset the lamp counter.
5.
If required, select another item you wish to adjust or press
MENU to exit.
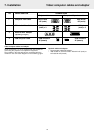
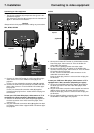
D
a
t
a
in
S
-V
ideo
in
V
ide
o
in
A
u
d
io
LR
D
a
t
a
in
S
-
V
i
d
e
o
in
V
i
d
e
o
in
A
u
d
io
L
R
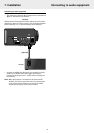
P
o
w
e
r
Data
Audio
V
i
d
e
o
A
u
d
i
o
o
u
t
A
u
d
i
o
o
u
t
USB in
USB in
USB out
USB out
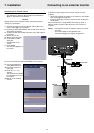
H
op
p
e
r S
V
1
0
H
o
p
p
e
r S
V
2
0
9. Maintenance
22
Settings
Display
Language
Start-up screen
Feedback
Monitor out
Lamp counter
Key lock...
Factory reset...
Picture Audio
Display
Language
Start-up screen
Feedback
Monitor out
Lamp counter
Key lock...
Factory reset...
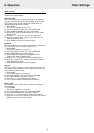
Lamp counter
0 hours
Lamp counter shows the operating hours of the
lamp. It is suggested to reset when a new lamp is
inserted. To reset keep confirmation key pressed
for 3 seconds.
Picture Audio Settings