


Getting Started with the DA700/DA750 Printer • 2
2-5SV61027 Rev. D
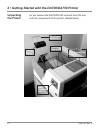
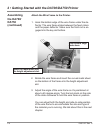
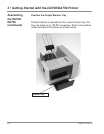
Once you’ve placed the printer in a suitable location, assem-
ble the printer components in the following order:
NOTE: Do not plug the printer into the power source until
you’ve completed steps 1-4.
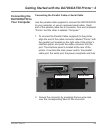
1. Attach the wire frame input stacker (page 2-6).
2. Install the sliding fence (page 2-7).
3. Position the output stacker (page 2-8).
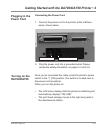
4. Connect the parallel or serial cable (page 2-9).
5. Attach the power cord and turn the printer ON
(page 2-11).
Assembling the
DA700/DA750
• DO NOT remove covers. The machine covers serve
to enclose hazardous parts. If the machine has been
dropped or has otherwise had the covers stressed in any
way, report it to your Pitney Bowes Customer Service
Representative.
• To reduce the risk of fire and/or electrical shock, do not
attempt to disassemble this machine. If service is re-
quired, contact your Pitney Bowes Customer Service
Representative.
• Keep fingers, loose clothing, jewelry and long hair away
from the moving parts.
• Use only Pitney Bowes approved ink cartridges and
cleaners. Read all instructions before attempting to oper-
ate the equipment.
• Follow any specific occupational safety and health stan
-
dards for your workplace or area.
Important
Safety Notes
(continued)