


Psion Teklogix NETBOOK PRO Win CE 4.2 User Manual 41
Chapter 3: Configuring The Unit
Things To Do Next
Connecting Via RS232 Serial
3.2.1.2 Connecting Via RS232 Serial
To connect using ActiveSync via RS232 serial:
1. Connect the NETBOOK PRO ActiveSync serial cable to the serial
communications port on your computer (usually COM1 or COM2).
2. Connect the other end of the serial cable to the NETBOOK PRO serial
port. The port is behind the rubber cover on the left hand side of the unit
(labelled with the symbol).
On the NETBOOK PRO...
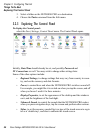
3. Open the NETBOOK PRO’s Control Panel.
4. Double-click on the PC Connection icon. The PC Connection dialog
opens.
5. Verify that the Use Connection checkbox is checked and that the unit
will connect using ‘Serial Cable on Com 1’.
On the PC...
6. Select File, Connection Settings in the ActiveSync window, or double-
click on the ActiveSync icon in the system tray. The ActiveSync menu
appears.
7. Select Connection Settings. The Connection Settings dialog appears.
8. Place a checkmark in the checkbox labeled ‘Allow serial cable or infra-
red connection to this COM port:’.
9. Select the COM port to which you connected the cable in Step 1.
10. Press OK. The Settings dialog disappears.
11. Select File, Get Connected. The Get Connected wizard appears.
12. Press Next. ActiveSync searches for a connection.
On the NETBOOK PRO...
13. Click on the Start button, then Programs, then ActiveSync, and select
direct from the ActiveSync menu. A dialog appears, indicating that the
NETBOOK PRO is attempting to connect.
RS232