


Installing ASM-60 1
Quick Start Guide
Installation of ASM-60 should be carried out only by an experienced technician. If
you are familiar with ASM-60, use this guide to prepare the units for operation.
1. Installing ASM-60
Setting the Internal Switches
To set internal switches:
1. Disconnect the power cord from the power source.
2. Slide the blue side panel forward to detach it from the case.
3. Unscrew the two screws located on the bottom panel at the rear end of the
unit.
4. Separate the two halves of the ASM-60 case by lifting the top cover at the end
of the unit and sliding it forward.
5. Set the internal switches of the Ethernet interface board (IR-ETH, IR-ETH/QH
or IR-IP).
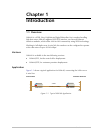
Connecting the Interfaces
1. Connect the line to the RJ-45 rear panel connector.
2. Connect the DTE to the appropriate rear panel connector.
3. Connect the control terminal to the front CONTROL DCE connector.
Connecting the Power
• Connect the AC power to the ASM-60 modem.
The PWR indicator turns on.