VRS Getting Started Guide
Kofax Image Products 19
Using the Auto Resolve Manager
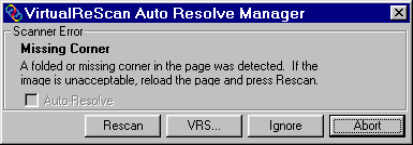
VRS opens the Auto Resolve Manager dialog box for each occurrence of an exception condition
with an Action type of Intervention or Auto Resolve, as defined in the VRS Administration
Utility dialog box. The Auto Resolve Manager gives you a range of exception handling selections,
as explained below.
Figure 14. VRS Auto Resolve Manager
Auto Resolve check box
The check box is selected if you designated the error condition action response as Auto
Resolve from the VRS Administration Utility dialog box. With the check box selected, the
Auto Resolve Manager goes into automatic mode. As a result, VRS automatically attempts to
rescan until the exception condition is resolved. If you want to temporarily disable the Auto
Resolve function for the error in question, clear the check box. Then select the Rescan button
when you are ready to scan the document again.
With the Auto Resolve check box cleared, the Auto Resolve Manager enters manual mode
and enables the Rescan, VRS, and Ignore buttons. As a result, VRS takes no action until you
select one of the buttons.
Rescan (manual mode only)
After reloading a document into the scanner, select this button to rescan the sheet.
VRS (manual mode only)
Use this button to open the VRS Interactive Properties dialog box, so that you can apply
property changes to the image in question. The VRS Interactive Properties dialog box opens
to the tab that most closely relates to the current exception image. For example, if you receive
a Brightness Out of Range warning, the VRS Interactive Properties dialog box would open to
the Clarity tab.
Ignore (manual mode only)
Use this button to accept the image "as is," send it to the scanning application, and proceed
with the scanning process.
Abort
Use this button stop the batch or cancel the scanning process. When you select Abort, any
error information is passed to your scanning application. The error image(s) are not sent to
the scanning application.
