


Operation
40 Runco CL-610 Series Owner’s Operating Manual
PRE
L
IMINAR
Y
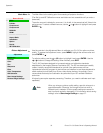
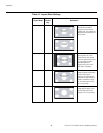
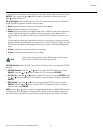
Installation To access the Installation adjustments, press MENU, then press the or button to
highlight Installation and press ENTER. The Installation sub-menu, shown at left, appears.
Press EXIT to return to the previous menu or press MENU to close all menus.
Language: Press the or button to select from the available languages: English,
French, Spanish, German and Italian.
Picture Orientation: Press the or button to change the orientation of the projected
image. The CL-610 can be installed on a ceiling or in a rear-screen configuration with one
or more mirrors. There are four settings: Floor Front, Ceiling Front, Floor Rear and Ceiling
Rear.
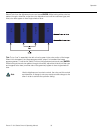
Keystone Adjust: To correct distortion resulting from the angle of projection, select
Keystone Adjust and use the
or button to make the image rectangular.
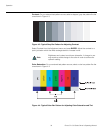
Background Color: Press the or button to select the image Background Color
(blue or white). The Background Color appears when no incoming signal is present.
RS-232 Baud Rate: Press the or button to select the projector’s RS-232 Baud
Rate. This function is used to change the transfer rate of the RS-232 connection. (This
setting must match the data rate of the device connected to the RS-232 input.)
Blue Image: Press the or button to turn the Blue Image Off or On. This feature
removes all red and green color information from the image (simulating a blue filter), and is
useful for color-calibrating the projector or other video components.
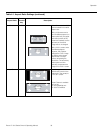
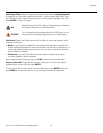
Option To access the Option adjustments, press MENU, then press the or button to
highlight Option and press ENTER. The Installation sub-menu will then appear (see
above). Press EXIT to return to the previous menu or press MENU to close all menus.
Reset Image Settings: To restore the default image settings for the current input source
ONLY, press the
button to highlight “Yes,” then press ENTER.
Sleep Timer: The Sleep Timer automatically puts the projector into standby mode after
the amount of time you specify here. (A warning appears on-screen one minute before this
is to occur.)
Use the or button to set the timer for anywhere from 10 minutes to 3 hours, in
10-minute increments. To disable the Sleep Timer, set it to 0.
Lamp Hours: To find out how long the projector lamp has been in use, select Lamp
Hours and press ENTER.
OSD Timer: Use the or button to set the OSD Timer. This timer controls how long
the menus remain on-screen after selecting them. Select from 0 to 60 seconds, in
3-second increments. When you set the OSD to 0, the menus remain on-screen until you
hide them by pressing MENU.
Installation
Language
Picture Orientation
Keystone Adjust
Background Color
RS-232 Baud Rate
Blue Image
➤
When you change a setting in the Installation menu, the change
takes effect immediately; you do not need to press ENTER
afterwards. (Press EXIT to return to the previous menu or MENU
to exit.)
Runco recommends that the keystone feature not be used unless
absolutely necessary, as it may cause artifacts in the image.
Note
Tip
Option
Reset Image Settings
Sleep Timer
Lamp Hours
OSD Timer
OSD Position
PC & HD Adjust
PIP/PBP Set Up
DNR
➤