


Maintenance and Troubleshooting
Runco SC-1 Owner’s Operating Manual 93
PRE
L
IMINAR
Y
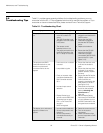
A projected image from a
DVD is split or otherwise
scrambled.
• DVD player is connected
to the Component input
and set to progressive
scan mode.
• Turn off progressive scan
on the DVD player. Or,
connect the DVD player to
the HD1 or HD2 input.
Image appears “squeezed” or
vertically stretched into cen
-
ter of screen.
• Incorrect aspect ratio
selection.
• Select a different aspect
ratio.
The display is jittery or
unstable.
• Poor-quality or improperly
connected source.
• The horizontal or vertical
scan frequency of the
input signal may be out of
range for the projector.
• Ensure that the source is
properly connected and of
adequate quality for
detection.
• Correct at the source.
Image is too bright and/or
lacks definition in the bright
areas of the image.
• Contrast is set too high. • Lower the contrast setting.
Image appears “washed out”
and/or dark areas appear too
bright.
• Brightness is set too high. • Lower the brightness
setting.
Colors in the image are
swapped; for example, reds
appear blue or vice versa.
•The Red/Pr, Green/Y or
Blue/Pb outputs from the
source are connected to
the wrong inputs on the
DHD Controller.
• Ensure that the source
outputs are connected to
the correct DHD Controller
input.
The display freezes suddenly. • Excessive voltage noise on
the AC or ground input has
interrupted the projector’s
ability to lock on to a
signal.
• Power down the projector
and disconnect from AC.
Then, plug in again and
power up as usual.
The projector will not turn
back on after it was powered
down, or the image disap
-
pears during operation.
• The projector will not turn
on for several minutes after
power-down, to protect
the lamp.
• The lamp has failed.
• Wait until the LED at the
front of the DHD Controller
turns red.
• Replace the lamp.
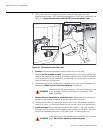
AutoScope lens motor does
not work.
• The motor is not plugged
in and turned on, or the AC
outlet is not active.
• The motor is not
connected to a trigger
output on the DHD
Controller.
• Incorrect trigger
assignment.
• Ensure that the motor is
plugged in and turned on,
and that the AC outlet is
active.
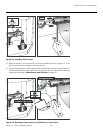
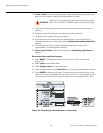
• Check the trigger
connection between the
lens motor and DHD
Controller (
Figure 3-18).
• Correct the trigger
assignment (refer to
Configure Lens Motor
Trigger on page 50).
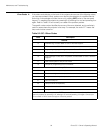
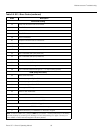
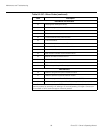
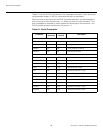
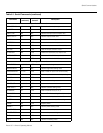
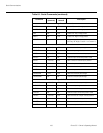
Table 5-1. Troubleshooting Chart (continued)
Symptom Possible Cause(s) Solution