


Maintenance and Troubleshooting
Runco SC-1 Owner’s Operating Manual 87
PRE
L
IMINAR
Y
Air Flow Interlocks: The lamp fan vane switch is located within the lamp cooling
compartment. The extractor vane switch is located just inside the top exhaust duct on the
projector. Check and, if necessary, clean the switches to remove accumulated dust or dirt
that could impede movement.
Within the exhaust duct connected at the top of the projector, adequate airflow must be
maintained and routed away from the operating area surrounding the projector. Inspect
regularly and confirm that:
• There are no obstructions or “kinks” within the ducting.
• All air intake areas of the projection head and ballast are unobstructed.
• Exhaust airflow at the top vent is at least 600 CFM. Make sure lamp wiring does not
interfere with vane switch operation. Refer to
Maintaining Proper Cooling on
page 84.
Laminar Airflow Device (LAD): Whenever you check or replace the air filter on the side
of the projector, also visually check the small square laminar airflow device just beyond the
filter opening. The LAD should be nearly white in color. If it is very dark (rare), it may need
to be replaced by a qualified service technician. Contact Runco or your dealer.
5.4
Lamp and Filter
Replacement
The SC-1 uses a xenon lamp to deliver its high brightness. The lamp should be replaced
when it reaches the end of its life (typically 1000 hours), or sooner if a noticeable
degradation in brightness occurs. When you replace a lamp, you should replace the air
filter as well.
Keep track of the number of hours the lamp has been in use and be aware of any changes
to brightness. These indicators will help you effectively maintain operation of the projector.
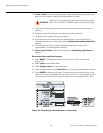
To find out how long the currently-installed lamp has been in service, select Lamp Hours
from the DHD Controller Installation menu (available by selecting Service -> Display
Device -> Configure -> Installation, in sequence).
Lamp ReplacementFor lamp or filter replacement, please contact your nearest Runco authorized
service center or Runco dealer. Do not attempt to replace the lamp yourself!
1. Turn off the projector. Allow the projector cooling fans to run for at least 10 minutes
prior to disconnecting the power cord and removing the lamp assembly for
replacement.
2. Disconnect the AC power cord from the projector.
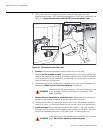
3. Remove the screw holding the lamp/air filter cover in place. Then, lift the cover up and
away from the projector (see
Figure 3-6).
4. Turn the knob to open the inner lamp cooling compartment and reveal the cathode
end (–) of the lamp (see
Figure 3-6).
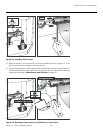
Xenon arc lamps are under high pressure and must be handled
with great care at all times. Lamps may explode if dropped or
mishandled. Allow the lamp to cool completely before attempting to
remove it.
Never open the lamp door unless you are wearing protective
clothing. Recommended protective clothing includes — but may
not be limited to — protective gloves, latex lab gloves, a
double-layer 0.040” acetate face shield, and a quilted ballistic nylon
jacket or welder’s jacket.
WARNING