


2.5 <
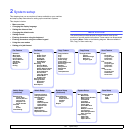
System setup>
Using the save modes
Toner Save mode
Toner Save mode allows your machine to use less toner on each page.
Activating this mode extends the life of the toner cartridge beyond what
one would experience in the normal mode, but it reduces print quality.
To turn this mode on or off, press Toner Save.
Note
When PC-printing, you can also turn on or off Toner Save mode
in the printer properties. See the Software Section.
Power Save mode
Power Save mode allows your machine to reduce power consumption
when it is not in actual use. You can turn this mode on and select a length
of time for which the machine waits after a job is printed before it switches
to a reduced power state.
1 Press Menu until System Setup appears on the bottom line of the
display and press OK.
2 Press OK when Machine Setup appears.
3 Press the Scroll buttons until Power Save appears and press OK.
4 Press the Scroll buttons until
On
appears and press OK.
5 Press the Scroll buttons until the time setting you want appears and
press OK.
6 Press Stop/Clear to return to Standby mode.
Scan Power Save mode
Scan Power Save mode allows you to save power by turning off the scan
lamp. The scan lamp under the scanner glass automatically turns off
when it is not in actual use to reduce power consumption and extend the
life of the lamp. The lamp automatically wakes up after some warm-up
time when you start scanning.
You can set the length of time for which the scan lamp waits after a scan
job is completed before it switches to the power save mode.
1 Press Menu until System Setup appears on the bottom line of the
display and press OK.
2 Press OK when Machine Setup appears.
3 Press the Scroll buttons until Scan PWR Save appears and press
OK.
4 Press the Scroll buttons until the time setting you want appears and
press OK.
5 Press
Stop/Clear
to return to Standby mode.
Setting print job timeout
You can set the amount of time a single print job is active before it must
print.
The machine handles incoming data as a single job if it comes in within
the specified time. When an error occurs while processing data from the
computer and the data flow stops, the machine waits the specified time
and then cancels printing if data flow does not resume.
1 Press Menu until System Setup appears on the bottom line of the
display and press OK.
2 Press OK when Machine Setup appears.
3 Press the Scroll buttons until Job Timeout appears and press OK.
4 Press the Scroll buttons until the time setting you want appears and
press OK.
5 Press Stop/Clear to return to Standby mode.
Altitude Adjustment
The atmospheric pressure could affect the printing quality. If you use the
machine in over 1,500 mm height altitude area, set the Altitude as
recommended in step 4 below.
1 Press Menu until System Setup appears on the bottom line of the
display and press OK.
2 Press OK when Machine Setup appears.
3 Press the Scroll buttons until AltitudeAdjustment appears and
press OK.
4 Press the
Scroll
buttons until the binding option you want appears.
• Plain: sets the machine to work best in altitude: 0 ~ 1500m.
• High: sets the machine to work best in altitude: 1500 ~ 2500m.
• Higher: sets the machine to work best in altitude: 2500 ~ 3500m.
• Highest: sets the machine to work best in altitude: 3500 ~ 4000m.
5 Press OK to save your selection.
6 Press Stop/Clear to return to Standby mode.
Auto Continue
This is the option to set the machine to continue printing or not, in case
the paper size you have set and the paper within the tray mismatches.
1 Press Menu until System Setup appears on the bottom line of the
display and press OK.
2 Press OK when Machine Setup appears.