


9.1 <
Faxing>
9 Faxing
This chapter gives you information about using your machine as a fax
machine.
This chapter includes:
Sending a fax
• Setting the fax header
• Adjusting the document settings
• Sending a fax automatically
• Sending a fax manually
• Confirming a transmission
• Automatic redialing
• Redialing the last number
Receiving a fax
• Changing receiving modes
• Receiving automatically in Fax mode
• Receiving manually in Tel mode
• Receiving manually using an extension telephone
• Receiving automatically in Ans/Fax mode
• Receiving faxes using DRPD mode
• Receiving in secure receiving mode
• Receiving faxes in memory
Other ways to fax
• Sending a fax to multiple destinations
• Sending a delayed fax
• Sending a priority fax
Sending a fax
Setting the fax header
In some countries, you are required by law to indicate your fax number
on any fax you send. The Machine ID, containing your telephone number
and name or company name, will be printed at the top of each page sent
from your machine.
1 Press Menu until Machine Setup appears on the top line of the
display.
2 Press Enter when Machine ID appears.
3 Enter your fax number using the number keypad and press Enter.
4 Enter your name or the company name using the number keypad.
You can enter alphanumeric characters using the number keypad,
and include special symbols by pressing the 0 button.
For details on how to enter alphanumeric characters, see page 2.3.
5 Press Enter to save the ID.
Adjusting the document settings
Before starting a fax, change the following settings according to your
original’s status to get the best quality.
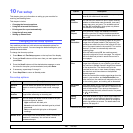
Resolution
The default document settings produce good results when using typical
text-based originals. However, if you send originals that are of poor
quality, or contain photographs, you can adjust the resolution to produce
a higher quality Fax.
1 Press Resolution.
2 Press Resolution or the Scroll buttons until the option you want
appears.
3 Press Enter to save your selection.