15
PRINT/SEND STATUS (JOB STATUS)
This screen appears when the [JOB STATUS] key on the operation panel is pressed.
The screen shows lists of the jobs that are reserved and in progress, and jobs that have been completed. This screen is
used to check jobs, move a job to the top of the job queue, or delete a job.
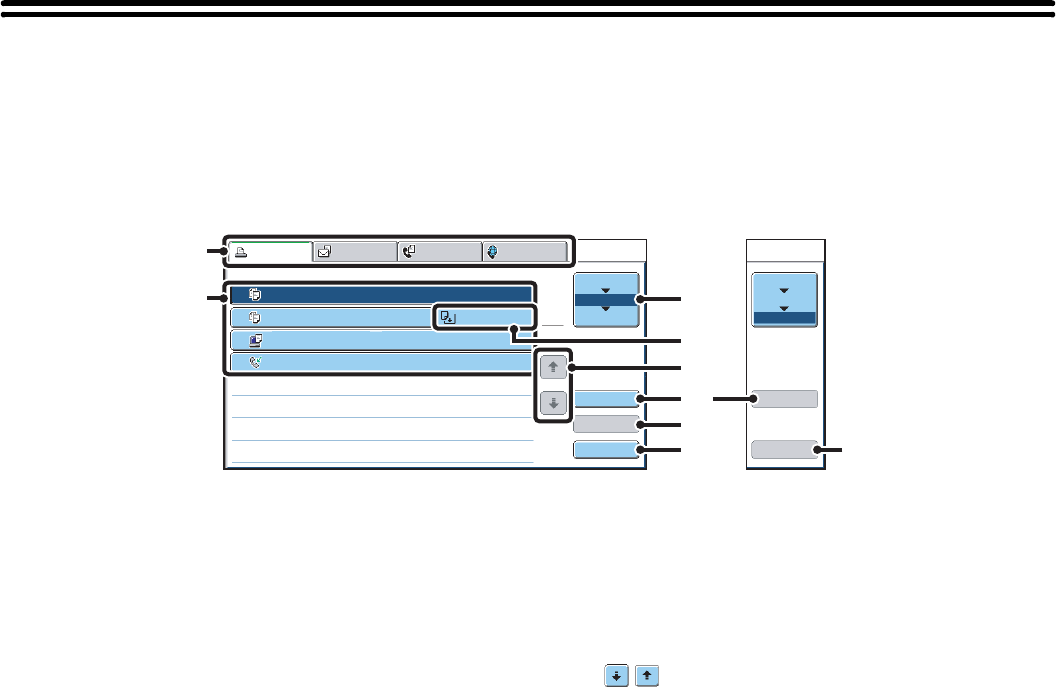
(1) Mode select tabs
Use these tabs to select print mode, scan mode, fax
mode, or Internet fax mode.
• The [Print Job] tab shows copy, print, received fax,
received Internet fax, and self print jobs.
• The [Scan to] tab shows transmission jobs that use the
scanner function.
• The [Fax Job] tab shows transmission (and reception)
jobs that use the fax and PC-Fax functions.
•
The [Internet Fax] tab shows transmission (and reception)
jobs that use the Internet fax and PC-I-fax functions.
For more information on the job status screen in each
mode, see the manual for each mode.
(2) Job list
• This shows jobs that are reserved and in progress (job
queue), and jobs that have been completed.
When the [Print Job] tab is touched in the mode select
tabs, the job status screen selector key changes and
the "Spool" list appears.
A brief description of each job and its status appears in
the list.
•
The "Spool" screen shows spooled print jobs and
encrypted PDF jobs waiting for password entry. To move
an encrypted PDF job from the spool list to the job queue,
touch the key of the job and enter the job password.
(3) Job status screen selector key
This switches the job list display between spooled jobs,
the job queue, and completed jobs.
"Spool": This shows spooled print jobs and encrypted
PDF jobs waiting for password entry. "Spool"
appears when print jobs are displayed.
"Job Queue": This shows reserved jobs and the job in
progress.
"Complete": This shows completed jobs.
(4) "Paper Empty" display
Add paper.
When the status is "Paper Empty", the specified size of
paper for the job is not loaded in any of the trays. In this
case, the job will be held until the required size of paper
is loaded. Other jobs that are waiting will be printed (if
possible) ahead of the held job. (However, other jobs will
not be printed if the paper ran out while printing was in
progress.)
If you need to change the paper size because the
specified paper size is not available, touch the key of the
job in the job list (2) to select it, touch the [Detail] key
described in (6), and select a different paper size.
(5) keys
These change the page of the displayed job list.
(6) [Detail] key
This shows detailed information on a selected job.
When a job has been stored using Quick File or File in
document filing mode, or when a broadcast transmission
has been performed in image send mode, the job
appears as a key in the completed jobs screen. You can
touch the [Detail] key to show details on the completed
job, and you can also touch the [Call] key to reprint or
resend the job.
(7) [Priority] key
A reserved job in the "Job Queue" screen can be printed
ahead of all other reserved jobs by selecting the job and
then touching this key.
In the print job queue, select the print or copy job to
which you wish to give priority and touch this key. The job
in progress stops and printing of the selected job begins.
When the selected job is completed, the interrupted job
resumes.
(8) [Stop/Delete] key
Use this key to cancel the job currently in progress or a
selected reserved job. Note that printing of received
faxes and received Internet faxes cannot be canceled.
(9) [Call] key
A job that appears in the completed jobs screen as a key
can be touched followed by the [Call] key to reprint or
resend the job. This is the same [Call] key that appears
when the [Detail] key is touched.
Spool
Complete
Job Queue
Detail
Call
Detail
Spool
Complete
Stop/Delete
2
3
4
002 / 000
Computer01 002 / 000
0312345678 001 / 000
Print Job
Job Queue Sets / Progress Status
Scan to Fax Job Internet Fax
Priority
1
1
Job Queue
1
020 / 001
Paper Empty
Waiting
Waiting
Copying
Copy
Copy
(1)
(2)
(6)
(3)
(7)
(8)
(5)
(4)
(9)
"Complete"
job screen
