


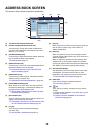


18
Special mode settings
Special modes can be selected.
☞ 4. SPECIAL MODES (page 70)
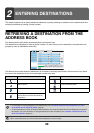
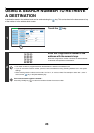
Enter the destination
Specify the destination of the scan transmission.
• [Address Book] key:
☞ RETRIEVING A DESTINATION FROM THE ADDRESS
BOOK (page 20)
RETRIEVING A DESTINATION FROM A GLOBAL
ADDRESS BOOK (page 25)
• [Address Entry] key:
☞ ENTERING AN ADDRESS MANUALLY (page 24)
• key:
☞ USING A SEARCH NUMBER TO RETRIEVE A
DESTINATION (page 23)
• [Resend] key:
☞ USING THE RESEND FUNCTION (page 27)
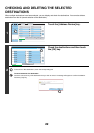
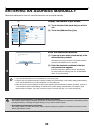
Start scanning and transmission
Start scanning and transmission.
If the original is placed on the document glass, follow these
steps to start scanning and transmission:
(1) Press the [COLOR START] key ( ) or the [BLACK
& WHITE START] key ( ).
(2) When scanning is finished, replace the original with the
next original.
(3) Press the [COLOR START] key ( ) or the [BLACK
& WHITE START] key ( ).
(4) Repeat (2) and (3) until all originals have been scanned.
(5) Touch the [Read-End] key.
• The [COLOR START] key ( ) cannot be used in Internet fax mode.
• After the original is scanned, the settings revert to the default settings.
To cancel scanning...
Press the [STOP] key ( ) to cancel the operation.
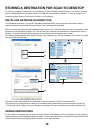
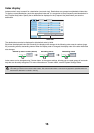
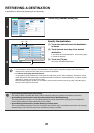
System Settings (Administrator): Default Display Settings
The settings can be kept in effect a fixed period of time after scanning is completed.
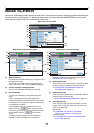
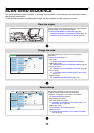
8½x11
Auto Auto
Auto
File
Quick File
Address Review
Send Settings
Address Entry
Address Book
USB Mem. ScanFaxInternet Fax PC Scan
Special Modes
Color Mode
File Format
Resolution
Exposure
Original
Scan:
Scan
Send:
Text
200X200dpi
PDF
Auto/Grayscale Mono2
PDF
Resend
Scan
Ready to send.
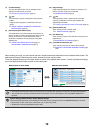
8½x11
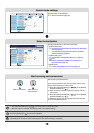
USB Mem. ScanFaxInternet Fax PC Scan
Quick File
File
Address Review
Send Settings
Address Entry
Address Book
Auto Auto
Auto
Special Modes
Color Mode
File Format
Resolution
Exposure
Original
Scan: Send:
Text
200X200dpi
PDF
Auto/Grayscale Mono2
PDF
Start color scanning Start black and
white scanning