


Ethernet-DK
18 Rev. 0.6
6.2.2. Programming the MCU
We will now build the project created by the TCP/IP Configuration Wizard and download the firmware to the MCU
using the Silicon Laboratories IDE.
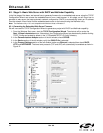
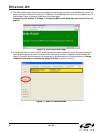
1. From the Windows Start menu, start the Silicon Laboratories IDE. The shortcut will be under the
StartSilicon Laboratories menu. Alternatively, the Silicon Labs IDE can be started by double-clicking
IDE.exe located by default in the “C:\SiLabs\MCU” directory.
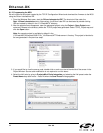
2. After the splash screen disappears, open the generated project using the ProjectOpen Project menu
command. Browse to the directory where the TCP/IP project was generated. Select TCPIP_Project.wsp, and
click the Open button.
Note: An example project is available by default in the
C:\SiLabs\MCU\Examples\C8051F12x_13x\Ethernet\HTTP\web-server-2 directory. This project is identical to
the one generated in the previous steps.
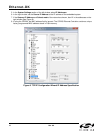
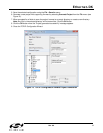
3. If you would like to view the source code, double-click on main.c on the left hand side of the screen. Source
code modification is not required to run this demo.
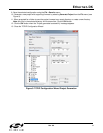
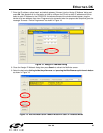
4. Select the Keil tools by going to ProjectTool Chain Integration and selecting the Keil preset under the
Preset Name drop down menu. Press No when the Save Preset? dialog appears.