


19
Using the projector
• If you want to use the PIP function, see "Displaying more than one image source
simultaneously" on page 32 for details.
Using the menus
The projector is equipped with multilingual On-Screen Display (OSD) menus for making
various adjustments and settings.
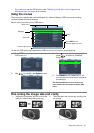
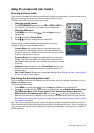
Below is the overview of the OSD menu.
To use the OSD menus, please set the OSD menu to your familiar language first.
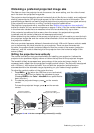
Fine-tuning the image size and clarity
Picture Mode
Load Settings From
Brightness
Contrast
Tint
Sharpness
Reset Picture Settings
Rename User Mode
Image
+ 2
S-Video
Cinema Mode
EXIT Back
Current input source
Main menu
Sub-menu
Highlight
Press EXIT to the
previous page or to exit.
Status
+ 50
+ 50
+ 50
0
Color
Information
Color
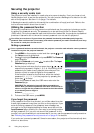
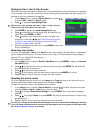
1. Press MENU on the remote control to turn the
OSD menu on.
2. Use / to highlight the System menu.
3. Press to highlight Language and
press / to select a preferred
language.
4. Press MENU once or EXIT twice* on
the remote control to leave and save
the settings.
*The first press leads you back to the main
menu and the second press closes the OSD
menu.
Picture Mode
Load Settings From
Brightness
Contrast
Tint
Sharpness
Reset Picture Settings
Rename User Mode
Image
S-Video
Cinema Mode
EXIT Back
Color
+ 2
+ 50
+ 50
+ 50
0
Color
Information
Language
Splash Screen
My Screen
Projector Position
Auto Off
Sleep Timer
Background Color
Menu Settings
Input Source
System
S-Video
English
SIM2
Auto Source Search
EXIT Back
Disable
Disable
Blue
On
Floor Front
Display
Setup
Language
Splash Screen
My Screen
Projector Position
Auto Off
Sleep Timer
Background Color
Menu Settings
Input Source
System
S-Video
English
SIM2
Auto Source Search
EXIT Back
Disable
Disable
Blue
On
Floor Front
Display
Setup
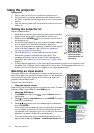
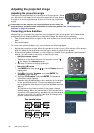
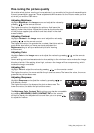
1. Adjust the projected picture to the size
that you need using the zoom ring.
2. Then sharpen the picture by rotating the
focus ring.