


99-00360-02 REV A0 Room Control Module Installation Guide for the 3000i 7
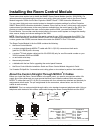
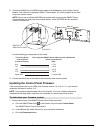
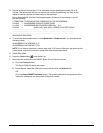
Updating the Control Panel Firmware
The procedure for updating the control panel firmware varies depending on the last four digits of
the serial number on your 3000i. You’ll find serial number labels in two places: on the patch panel
at the rear of the cabinet and inside the right-hand door on the front of the cabinet.
Last Four Digits of the Serial No. on Your 3000i
Tasks Required to Update the Control Panel Firmware 05000–
05999
06000–
06999
07000–07999 08000+
Connect the I
2
C flash adapter cable to the I
2
C control
panel flash cable and the SC7 serial controller (page 7)
1
st
task
Connect the I
2
C control panel flash cable to the SC7 serial
controller (page 9)
1
st
task
Connect the SMART Room Control Module to a third-
party room-control system (page 10)
2
nd
task 1
st
task 2
nd
task 1
st
task
Use WBDiag to determine the control panel firmware
version (page 11)
3
rd
task 2
nd
task 3
rd
task 2
nd
task
If the control panel firmware version is 2.0, 2.10 or 2.11,
update the firmware to version 2.12 (page 12)
4
th
task 3
rd
task 4
th
task
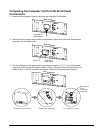
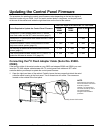
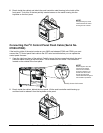
Connecting the I
2
C Flash Adapter Cable (Serial No. 05000-
05999)
If the last four digits of the serial number on your 3000i are between 05000 and 05999, you must
insert the I
2
C flash adapter cable between the I
2
C control panel flash cable and SC7 serial
controller before you attempt to update the control panel firmware.
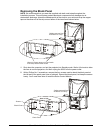
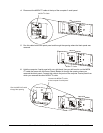
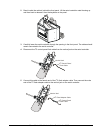
1 Open the right-hand door of the cabinet. Partially loosen the two screws that attach the serial
controller metal housing to the front panel. Two or three turns will suffice. The screws are
located on the outside of the front panel.
Partially loosen both screws
NOTE:
Several figures show the top
half of the cabinet removed fo
r
illustration purposes.
However, you should leave
the screen and the top half of
the cabinet attached
throughout the installation
p
rocedure.