


SonicWALL SSL VPN 4000 Getting Started Guide Page 21
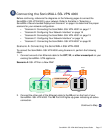
Configuring Your Gateway Device
Now that you have set up your SonicWALL SSL VPN 4000, you need to configure your
gateway device to work with the SonicWALL SSL VPN 4000. Refer to the table in
“Selecting a SonicWALL Recommended Deployment Scenario” on page 4 to determine
the proper scenario for your network configuration.
This section contains the following subsections:
• “Scenario A: SSL VPN on a New DMZ” on page 21
• “Scenario B: SSL VPN on Existing DMZ” on page 35
• “Scenario C: SSL VPN on the LAN” on page 47
Scenario A: SSL VPN on a New DMZ
This section provides procedures to configure your gateway appliance based on
Scenario A. This section contains the following subsections:
• “Scenario A: Connecting to the SonicWALL UTM Appliance” on page 21
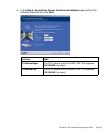
• “Scenario A: Configuring a DMZ or OPT Port in SonicOS Standard” on page 22
• “Scenario A: Allowing WAN -> DMZ Connection in SonicOS Standard” on page 22
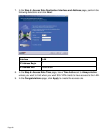
• “Scenario A: Allowing DMZ -> LAN Connection in SonicOS Standard” on page 24
• “Scenario A: Adding a New SSL VPN Custom Zone in SonicOS Enhanced” on
page 28
• “Scenario A: Allowing WAN -> SSL VPN Connection in SonicOS Enhanced” on
page 29
• “Scenario A: Allowing SSL VPN -> LAN Connection in SonicOS Enhanced” on
page 32
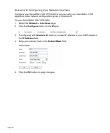
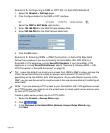
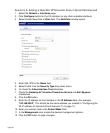
Scenario A: Connecting to the SonicWALL UTM Appliance
1. Using a computer connected to your LAN, launch your Web browser and enter the IP
address of your existing SonicWALL UTM appliance in the Location or Address
field.
2. When the management interface displays, enter your user name and password in
the appropriate fields and press the Login button.
Note: Remember that you are logging into your SonicWALL UTM appliance, not the
SonicWALL SSL VPN 4000. Your user name and password combination may be
different from the user name and password you recorded for your
SonicWALL SSL VPN 4000.