


16 Sun Quad FastEthernet 6U CompactPCI Adapter Installation and User’s Guide • June 2000
▼ To Install the Rear-Access Front Card
After installing the rear transition card, you can install the front card. The front card
is hot-swap aware, which means the system will recognize the card during the
installation.
1. Walk to the front of the server.
2. Confirm or reattach your wrist strap to the system’s chassis and to your wrist.
If necessary, remove the strap from the rear of the chassis and attach it to the front of
the chassis.
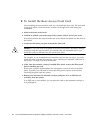
3. Locate the slot where you plan to install the front card.
Caution – This card must be installed in the front CompactPCI slot that is directly
associated with the rear slot where you installed the rear transition card. If you
install the card in a different slot, the system may panic.
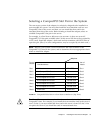
For example, if you installed the rear transition card into the rear slot 3, you must
install the front card into the front slot 3. See “Selecting a CompactPCI Slot Pair in
the System” on page 9 for more information.
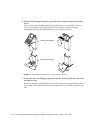
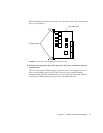
4. If the front slot contains a factory-installed filler panel, remove the filler panel
before installing the card.
Refer to the system’s documentation for instructions on how to remove the filler
panel. Typically, you will need to loosen the filler panel’s captive screws before
removing the panel from the system.
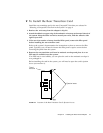
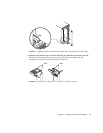
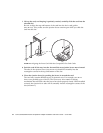
5. Remove the card from its antistatic envelope and place it on an ESD mat (if
available) near the system.
If an ESD mat is not available, you can place the card on the antistatic envelope it
was packaged in.