


Chapter 2 Installing the Rear-Access Adapter 25
▼ To Power On the Server
This procedure describes a general overview for powering on the server. Refer to
your server’s documentation for the exact procedure.
1. Before powering on the server, make sure that all any peripheral devices
connected to the server are powered on.
2. Follow the appropriate procedures, as documented in the server’s service manual,
to power on the system.
Refer to the server’s documentation for the complete power on procedure.
For example, if you installed the adapter in a Netra ct server, refer to the Netra ct
Server Service Manual. This manual contains the power on procedures.
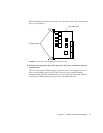
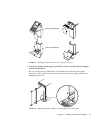
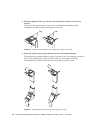
3. During the power on sequence, watch the hot-swap LED on the adapter’s front
card (
FIGURE 2-11).
■ The LED should blink quickly and then stay off if the adapter was installed
correctly.
■ If the hot-swap LED remains on (lit), the adapter was not installed correctly. One
or both of the cards may not be seated correctly in the slot. You must remove and
reinstall the adapter’s two cards to make sure that they sit correctly in the slots.
Use the cold-swap procedures to re-install the two cards:
■ Power off the server
■ Remove and replace the rear transition card
■ Remove and replace the front card
■ Power on the server
Refer to the system’s documentation for additional troubleshooting instructions.
4. Verify that the server’s power LED is on (lit), indicating that the system has
completely powered on.
Refer to the server’s documentation for the location of the power LED. For example,
on a Netra ct server, the power LED is on the front panel.